In software testing, we mostly focus on two types – functional and non-functional testing. Out of that, we will focus on functional testing. It is a practice that delivers huge benefits to the development process. When done properly, it increases communication between analysts, developers, and testers. The progress of the entire project is objectively visible at any point in time to management by examining the passing (and failing) functional tests. Eventually, the speed of development increases because well-communicated requirements result in less re-work. The tests also drive a more modular architecture with subsystems that have clear responsibilities.
This blog specifies the scope of different types of functional testing, their importance, and when to perform them. For example, smoke testing is performed on each build delivered to QA because it verifies the functionality at a high level while regression testing is performed when bugs are fixed in subsequent releases.
Different Types of Functional Testing
Unit Testing
Unit testing ensures that each part of the code developed in a component delivers the desired output. In unit testing, a part of agile testing, developers only look at the interface and the specification for a component. It provides documentation of code development as each unit of the code is thoroughly tested standalone before progressing to another unit.
Unit tests support functional tests by exercising the code that is most likely to break. If you use functional tests without unit tests, you may experience several smells:
- It’s hard to diagnose failed tests
- Test fixtures work around known issues rather than diagnosing and fixing them
Component Testing
Testing a module or component independently to verify its expected output is called component testing. Generally, component testing or module testing is done to verify the functionality and/or usability of a component but not restricted to only these. A component can be of anything which can take input(s) and delivers some output.
Example:
For example, the module of code, web page, screens and even a system inside a bigger system is a component to it.
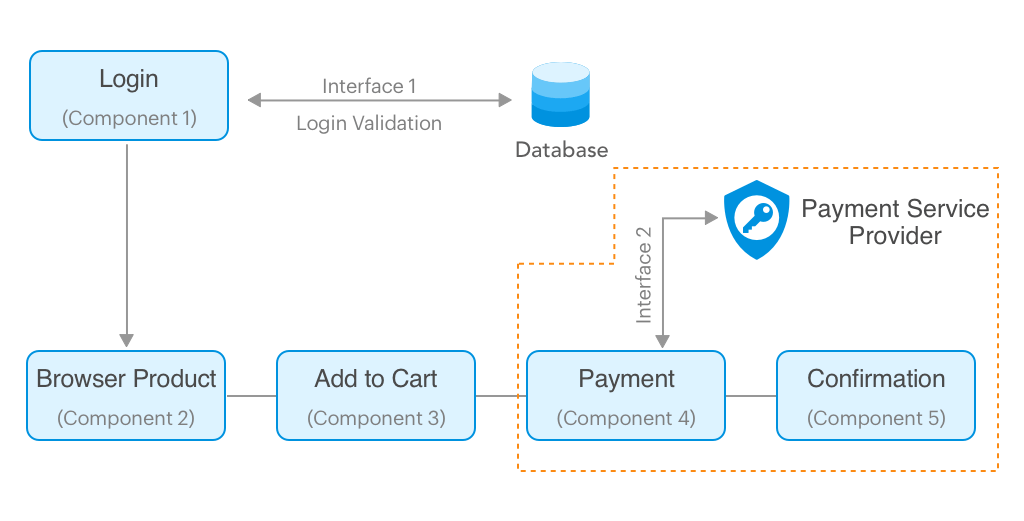
From the above picture, Let’s see what all we can test in component 1 (login) separately:
- Testing the UI part for usability and accessibility
- Testing the Page loading to ensure performance
- Trying SQL injection through the UI components to ensure security
- Testing the login functionality with valid and invalid user credentials
Smoke Testing
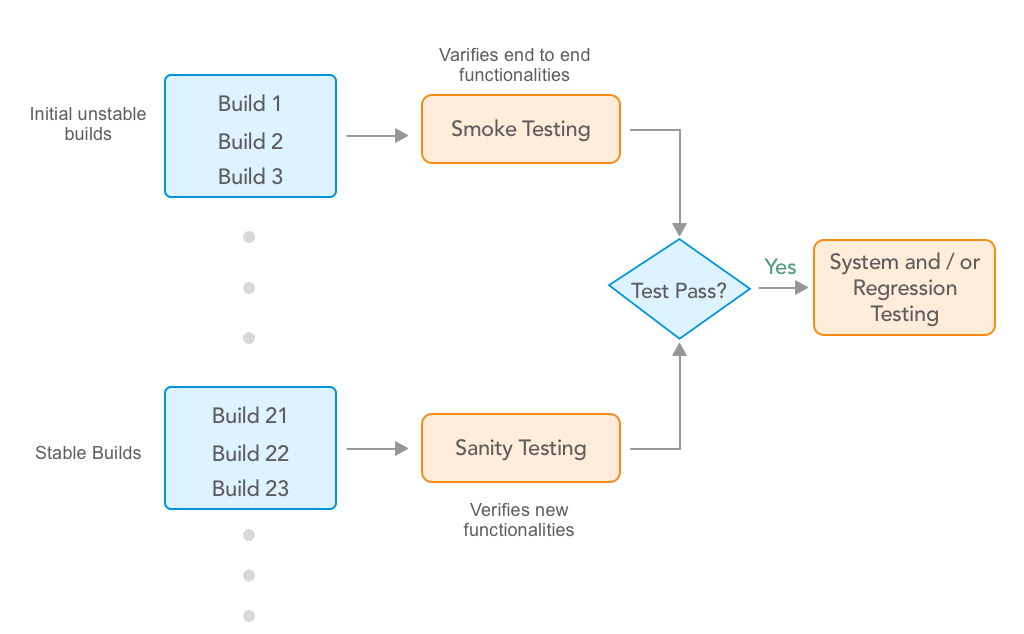
Smoke testing is performed on the ‘new’ build given by developers to the QA team to verify if the basic functionalities are working or not. It is one of the important functional testing types. This should be the first test to be done on any new build. In smoke testing, automated test cases chosen cover the most important functionality or component of the system. The objective is not to perform exhaustive testing, but to verify that the critical functionality of the system is working fine.

If the build passes the smoke testing then it is considered as a stable build. On the stable build, QA team performs functional testing for the newly added features/functionality and then performs regression testing depending upon the situation. But if the build is not stable i.e. the smoke testing fails then the build is rejected and forwarded to the development team to fix the build issues and create a new build. Let’s understand it better with an example.
Example:
We’ve built an Employee portal application for our client. As we follow continuous testing we had to test each build right after its development phase. The client wanted us to build the portal which consists of features like leave application, leave reports, store employees’ data, etc.
First, developers build a leave application feature and passed to QA for testing. The QA team examined that the entire build required 80-100 test cases for all the scenarios:
- Login
- Show total leaves count and types
- Testing of the calendar while selecting the date
- Select date
- User should be able to fill the required information. i.e., a reason of the leave
- After applying request sent to the manager for approval
- Manager approves the leave
- Employee gets notified
- Leave gets deducted from the total count
- Logout
Here smoke testing verifies only critical functionalities which had only 20 test cases. These test cases covered the following scenarios:
- Login
- Select date
- Fill other details
- Request sent to the manager after clicking the button
As you can see we have taken only the main features for testing which were critical. For example, if an employee can’t select the date then there’s no need for further testing. This saves the developers’ time of fixing bugs.

Integration Testing
Integration testing is performed to test individual components to check how they function together. In other words, it is performed to test the modules which are working fine individually and do not show bugs when integrated. It is the most common functional testing type and performed with a test automation framework.
Generally, developers build different single modules of the system/software simultaneously and don’t focus on others modules while they develop pne. They perform extensive black and white box functional verification, commonly known as unit tests, on the individual modules. Integration tests cause automation data and operational commands to flow between modules which means that they have to act as parts of a whole system rather than individual components.
This typically uncovers issues with
- UI operations,
- data formats,
- operation timing,
- API calls,
- database access, and
- user interface operation.
Example:
Let’s take an example of another project of search functionality in the e-commerce site where it shows the results based on the text entered by users. The complete search function works when developers build the following four modules.
Module #1: This is the search box visible to users where they can enter text and click the search button.
Module #2: It’s a converter or in simple terms program which converts entered text into XML.
Module #3: This is called Engine module which sends XML data to the database.
Module #4: Database
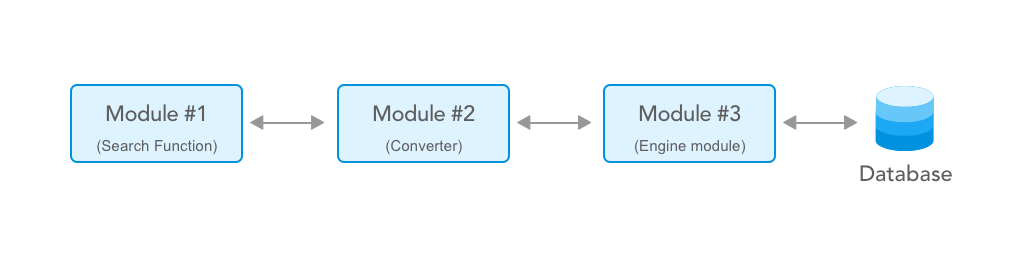
In our scenario, the data entered in the search function (module #1) gets converted into XML by module #2. The EN module(module #3) reads the resultant XML file generated by module 2 and extracts the SQL from it and queries into the database. The EN module also receives the result set and converts it into an XML file and returns it back to the UI module which converts the results in user readable form and displays it.
So where does Integration testing comes into the picture?
Well, testing whether the information/data is flowing correctly or not will be your integration testing, which in this case would be validating the XML files. Are the XML files generated correctly? Do they have the correct data? Has the data been transferred correctly from one module to another? All these things will be tested as part of Integration testing.
Checking of data transfers between two components is called Interface Testing. It is a part of integration testing.
Interface testing includes testing of interfaces such as web services, APIs, connection strings that connect two components in the application. These interfaces don’t have a UI but take an input and deliver output (do not confuse it with Unit testing).
Interface testing is done to check that the different components of the application/ system being developed are in sync with each other or not. In technical terms, interface testing helps determine that different software functions like data transfer between the different elements in the system are happening according to the way they were designed to happen.
Let’s see how to test the Interface 2 in the component testing example considering that the interface takes an XML file as input from Component 4 and delivers a JSON file as output with a response message from the payment service provider. To test this interface we do not need to worry about the functionality of component 4. All we need is the specification of the XML file from Component 4 and the specification of JSON output. With the help of these specifications, we can create the sample input XML files and feed into the interface. The interface will pass the input to the payment service provider and returns an output JSON file. So in our example, validating the input file and the output file with the requirement is called Interface Testing.
Regression Testing
Whenever developers change or modify the functionality/feature, there’s a huge possibility that these updates may cause unexpected behaviors. Regression testing is performed to make sure that a change or addition hasn’t broken any of the existing functionality. Its purpose is to find bugs that may have been accidentally introduced into the existing build and to ensure that previously removed bugs continue to stay dead. There are many functional testing tools available which support regression testing.
Example:
Let’s understand it by continuing our example of the leave management system. Let’s assume that developers have built a new feature(build 2) which shows the report of the employee’s leave history. Now, testers need to test this new feature by performing smoke testing with new test cases. Now, testers need to perform regression testing on build 2(Leave reports) to ensure that the code carried over from Build 1 (Leave application) behaves correctly. Here the main principle is reusing tests derived from Build 1. Also, the test case for build 2 would be a subset of build 1.
Regression testing can become a challenge for the testers as well. Here are some of the reasons:
- The Number of test cases in the regression suite increases with each new feature.
- Sometimes, the execution of the entire regression test suite becomes difficult due to time and budget constraints.
- Minimizing the test suite while achieving maximum test coverage is not a cake walk.
- Determination of frequency of Regression Tests after every modification or every build update or after a bunch of bug fixes is always a challenge.
Sanity Testing
When a new build is received with minor modifications, instead of running a thorough regression test suite we perform a sanity test. It determines that the modifications have actually fixed the issues and no further issues have been introduced by the fixes. Sanity testing is generally a subset of regression testing and a group of test cases executed that are related to the changes made to the product. Many testers get confused between sanity testing and smoke testing. Refer below image to understand the basic difference.
Example:
Let’s continue with the above example of the leave management system. Let’s assume that developers have released the build 2 with some other features. Now first we need to perform smoke testing and check whether the overall functionality is working fine. Here we are assuming that the build 2 has passed the smoke test. Now, we know that we’ve reported for “date selection” in build 1 and it has been solved in build 2. In sanity testing we’ll only test “date selection” functionality and whether it affects other functionalities.
System Testing
System testing is testing conducted on a complete, integrated system to evaluate its compliance with the specified requirements.
After completing the integration testing, system testing is the next testing type in the Software Testing Life Cycle (STLC). System testing is undertaken by independent testers who haven’t played a role in developing the program. This testing is performed in an environment that closely mirrors production. System tests are very important because it verifies that the application meets the technical, functional, and business or customer requirements that were set by the stakeholder.
Example:
In our example, we can perform system testing when all the modules are developed and passed integration successfully. For example, the complete product may include features like leave application, reports, employee details, performance tracker, etc.
User Acceptance Testing
User acceptance testing (UAT) is the last phase of the software testing process. In UAT actual software/app users test the software to make sure it can handle required tasks in real-world scenarios. Generally, it is performed at the time of product delivery to stakeholders as a final checkpoint among all functional testing types.
From starting to deployment, the software/app undergoes through various types of testing by testing team and developers. The end goal of all the efforts is to deliver a working software/app that fulfills users’ requirements and the client’s expectations. Both the teams become so familiar with the application that they might become a victim of tunnel vision. They are fully aware of workarounds and may skip certain scenarios which might be critical for end users.
The users are naive about how the application works. They are focused on ‘How the application should behave?’ They use the application with a fresh mind and whether it is intuitive to follow or not. UAT is based on user stories and establishes how well it meets their requirements. Users do not use ‘Test to Break’ approach while doing user acceptance testing. Rather, UAT is a measure of how good your application performs in normal scenarios.
API Testing
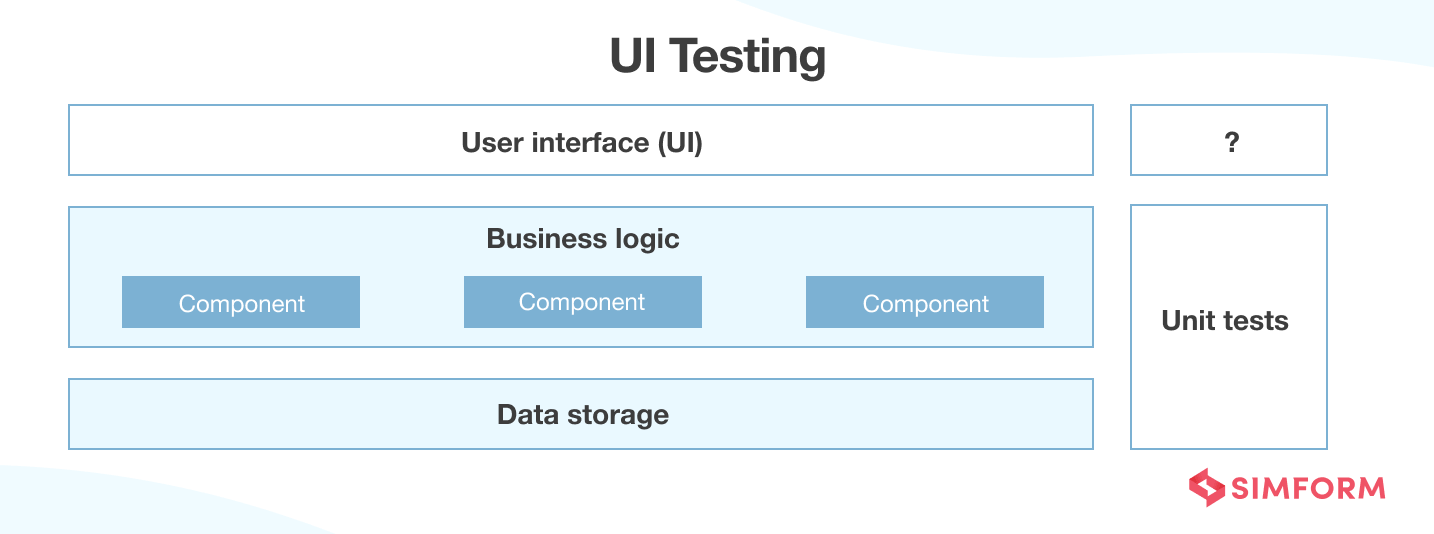
API testing is software testing that aims to validate the APIs. API testing aims to check APIs’ reliability, performance, security, and functionality. Here, you utilize software to send calls to APIs, get the related output, and note down the system’s response. Any software application comprises three-layer architecture: presentation layer, business logic layer, and database layer.
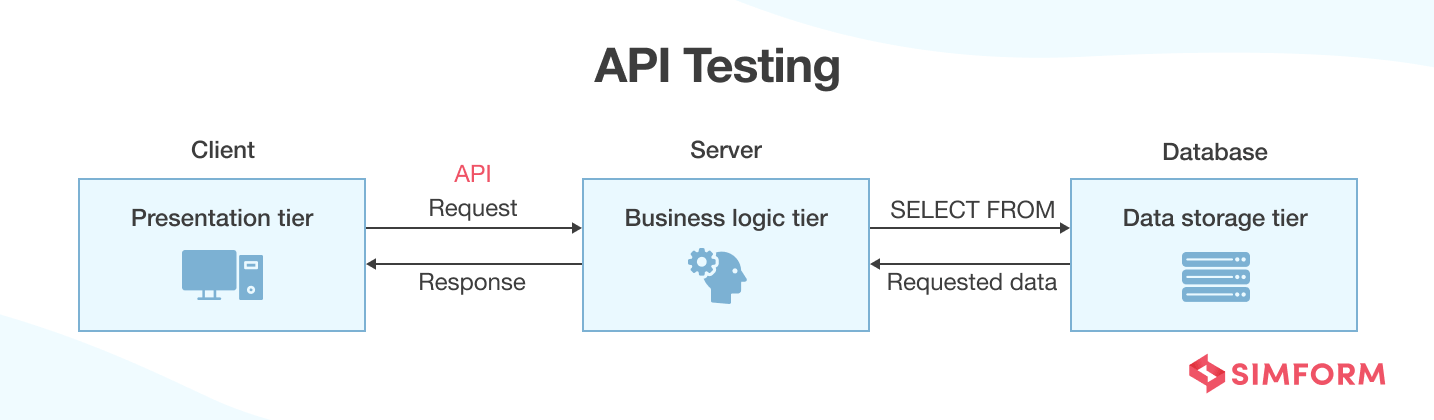
API testing focuses on the business logic layer. The reason is that the business logic layer comprises the application’s core functionality. It takes the information from the presentation layer, queries the database layer, transforms data according to business logic, and presents it to the end users. For these communications, the role of API comes into play.
There are five significant steps involved in a typical API testing procedure:
Step 1: Reviewing API Specification
Before starting the testing procedure, you need to understand the purpose of the API, how it functions, and the expected result. For that purpose, reviewing API specifications is vital.
Step 2: Determining API Testing Requirements
Here, you need to know the target customer for the APIs, their functions and features, the workflow of the application, and the problems for which you’re conducting API testing. You also need to know the desired output expected from testing.
Step 3: Defining Input Parameters
Before calling any API, defining the input parameters is essential. The parameters pass information needed for APIs to perform the desired functions. It also helps you know whether an API works correctly or requires modifications.
Step 4: Creating Positive and Negative Tests
To assess whether the APIs are working correctly, you should run a combination of positive and negative tests. Positive tests check the basic functionality of API using input parameters, while negative tests check how APIs respond to prohibited operations.
Step 5: Select the API Testing Tool
With all the prerequisites completed, it’s time to identify the right API testing tool to replace repetitive tasks with automation tasks and provide quick and reliable results. Many software testing tools related to API testing, such as
- Postman
- Apigee
- JMeter
- Soap UI
- Katalon
Example:
One of the most relatable examples of API testing would be when you log in to a social media application like Twitter or Instagram. One can log in with the necessary credentials or third-party services like Google and Facebook. If the user opts for third-party services, the role of API testing comes into the picture. API testing is conducted to ensure social media apps collaborate with third-party services and pull out the information required for granting user access.
UI Testing
UI testing is a software testing technique that tests the functionality or features of the software or application that comes into interaction with end-users. It involves visual elements and graphical icons, such as
- The menu box
- Radio buttons
- Text boxes
- Checkboxes
- Toolbars
- Colors
You can perform UI testing manually or with automated functional testing tools. However, nowadays, automated first approach and automated tools are the preferred things.
UI testing comprises two things –
- (i) checking how applications handle the action users carry using input devices like keyboard and mouse.
- (ii) checking whether visual elements get displayed correctly.
It helps you know whether the application’s functional requirements get met and whether end-users will adopt them.
Here are some of the test cases you must involve in while conducting functional UI testing:
- Field Widths: If a text box permits a specific number of characters, ensure that you don’t allow users to enter more than the specified characters in the text box.
- Navigation Elements: Verify if all the navigation buttons on the user interface are working correctly.
- Data Type Errors: Ensure the user can only add valid data for specific data formats such as phone numbers, dates, currency, etc.
- Progress Bars: When displaying screens that may take some time to render, show progress bars to users to keep them engaged.
- Type-Ahead: If your UI comprises drop-down menus, include a type-ahead feature that allows users to type the first letter and find suitable options from a list of hundreds.
- Error Logging: When the system experiences any fatal error, it writes the error details in a log file which may get reviewed by the testing team for root cause analysis.
- Table Scrolling: If data in your tables extends to another page, scrolling allows users to scroll through the data while keeping the headers intact.
- Menu Items: Ensure the application only displays valid menu items at a particular time.
- Working Shortcuts: For applications that support shortcuts, ensure they work correctly despite any device, browser, or platform.
There are three major approaches to UI testing:
1. Manual Testing: A human tester performs operations to verify whether the application functions correctly and whether the graphical elements are in order. Manual testing can be time-consuming, and test coverage could be meager.
2. Record and Playback Testing: You use automated testing tools to record tasks, actions, and interactions within the application. The steps recorded by the test tool get reproduced, executed, and compared with the expected outcome to know whether the application work properly.
3. Model-Based Testing: The focus is creating a graphical model that defines the application’s ability and behavior. It provides a deeper understanding of the system, enabling QA teams to design efficient test steps. You need to determine input and output before working with this approach.
Example:
The Google Sign-Up form can be a great example of UI testing. The figure below shows you can identify 11 test cases from TC-1 to TC-11.
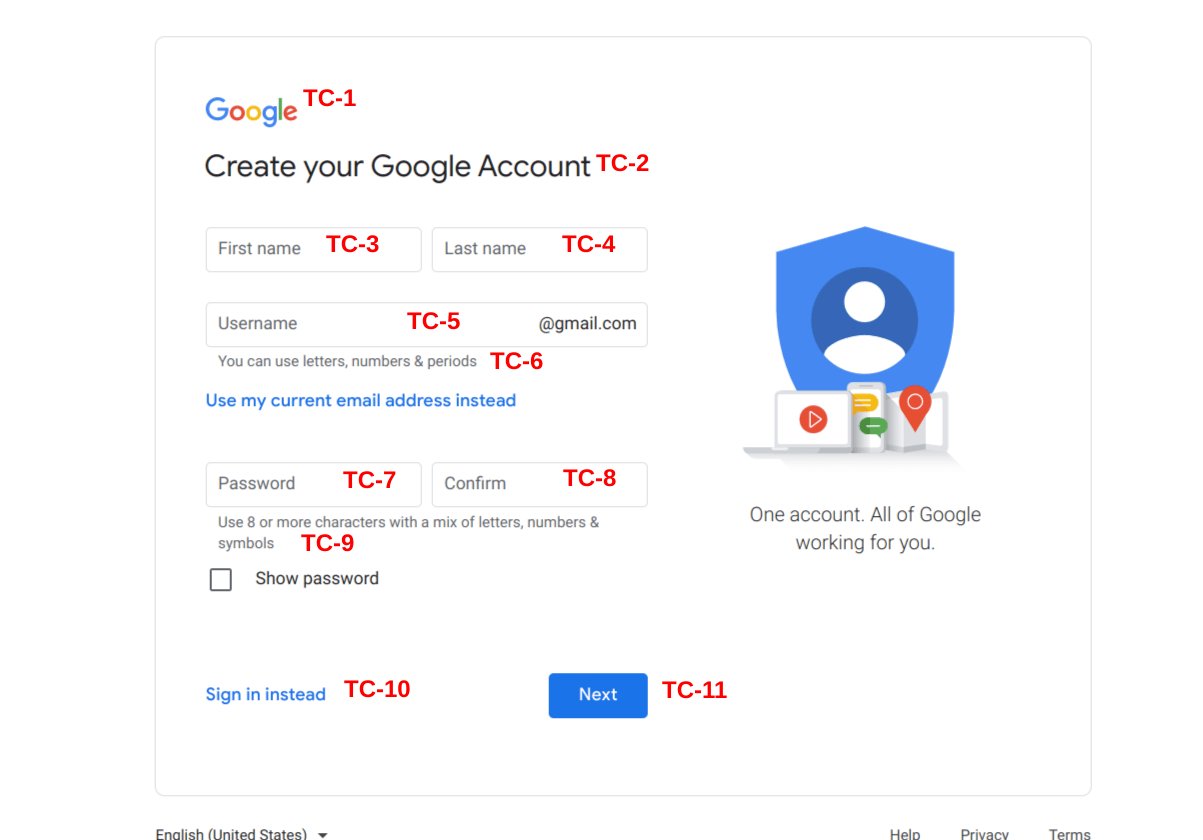
TC-1: Checking page label, position, and font.
TC-2: Validating the page heading and checking the font.
TC-3: Checking positioning and alignment of the text box and checking the acceptance of valid and invalid characters in the field labels.
TC-4: Checking positioning and alignment of the text box and checking the acceptance of valid and invalid characters in the field labels.
TC-5: Testing the error message by entering permitted and prohibited characters and verifying the error message’s correctness.
TC-6: Testing pop-ups and hyperlinks.
TC-7: Checking positioning and alignment of the text box and checking the acceptance of valid and invalid characters in the field labels.
TC-8: Saving an unmatched password, checking the positioning and alignment of the text box, and checking the acceptance of valid and invalid characters in the field labels.
TC-9: Testing the error message by entering permitted and prohibited characters and verifying the error message’s correctness.
TC-10: Testing pop-ups and hyperlinks.
TC-11: Testing form submission and checking button position.
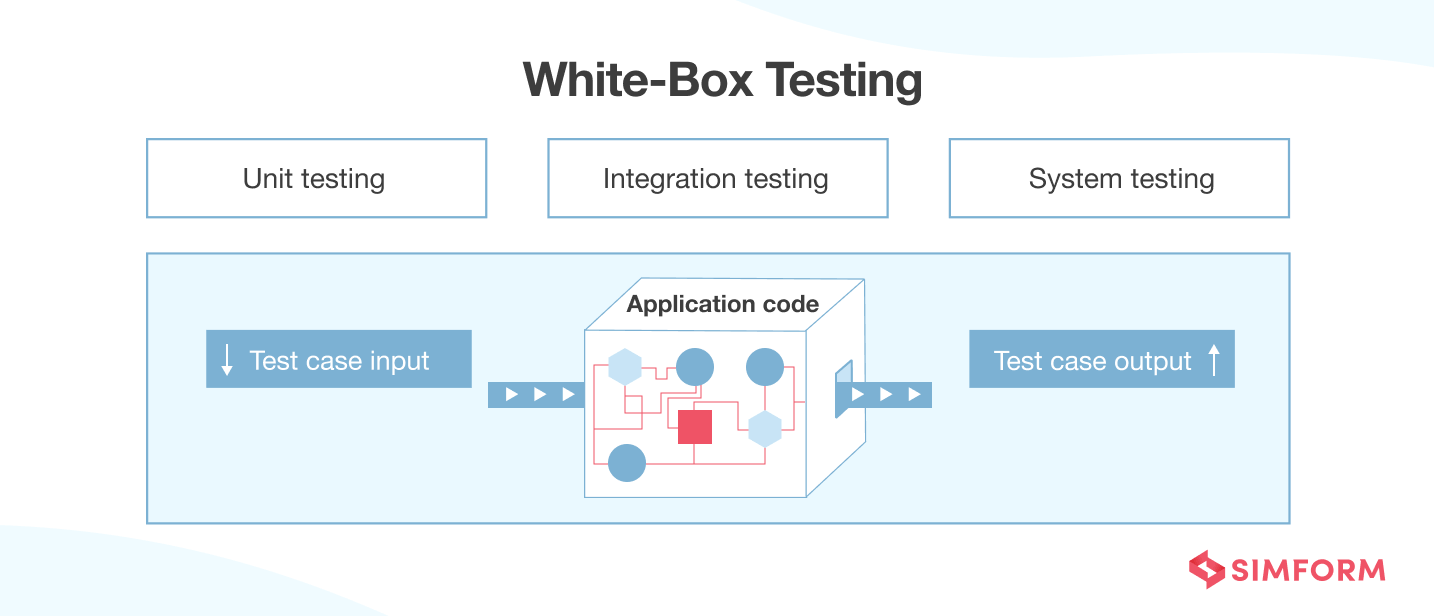
White-Box Testing
White-box testing is also known as glass box testing, structural testing, clear box testing, open box testing, and transparent box testing. It inspects the inner workings of a software system – code, infrastructure, and integrations with external systems.
White box testing has become integral to the basic automation test bucket build process following the CI/CD (Continuous Integration/Continuous Deployment) approach. People often refer to white-box testing as a core part of Static Application Security Testing (SAST). The testing methodology helps verify input-output flow and improve design, usability, and security.
Two significant steps are involved in a typical white-box testing procedure:
Step 1: Understanding the Source Code
The first thing testers must do is learn and understand the application’s source code. As white-box testing deals with the inner workings of an application, testers must know the programming language involved in the making of the application.
Moreover, the testing person should know the coding practices and standards. Lastly, white-box testing concerns security loopholes, so testers should be competent in dealing with security issues, how to find and mitigate them, and also know the best practices followed for security.
Step 2: Creating Test Cases and Executing Them
After developing a deeper understanding of the source code level and security practices, the next step is to test the application’s source code for flow and structure. Testers must work on developing test cases or test scripts for a series of the business process involved in the application.
They can do this task manually or by using an open-source testing tool. Once the test cases are ready, the tester should execute them using the chosen automation tool and record the output they get. It helps you to discover the potential loopholes if any.
You can use various functional testing techniques related to white-box testing:
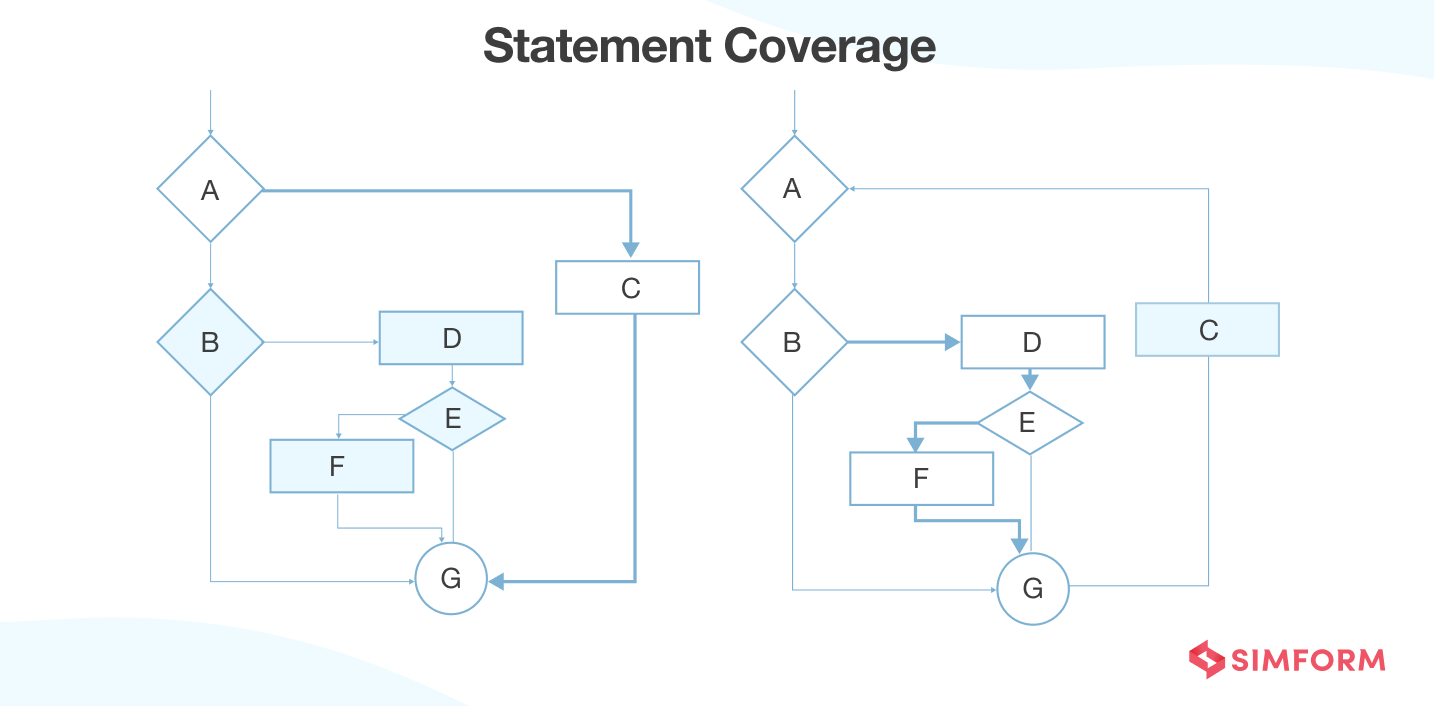
1. Statement Coverage: The aim is to traverse all the statements at least once. So, you test each line of code. If you explain it in a flowchart, you must traverse each statement at least once. Since all lines get covered, you can quickly pinpoint the faulty code.
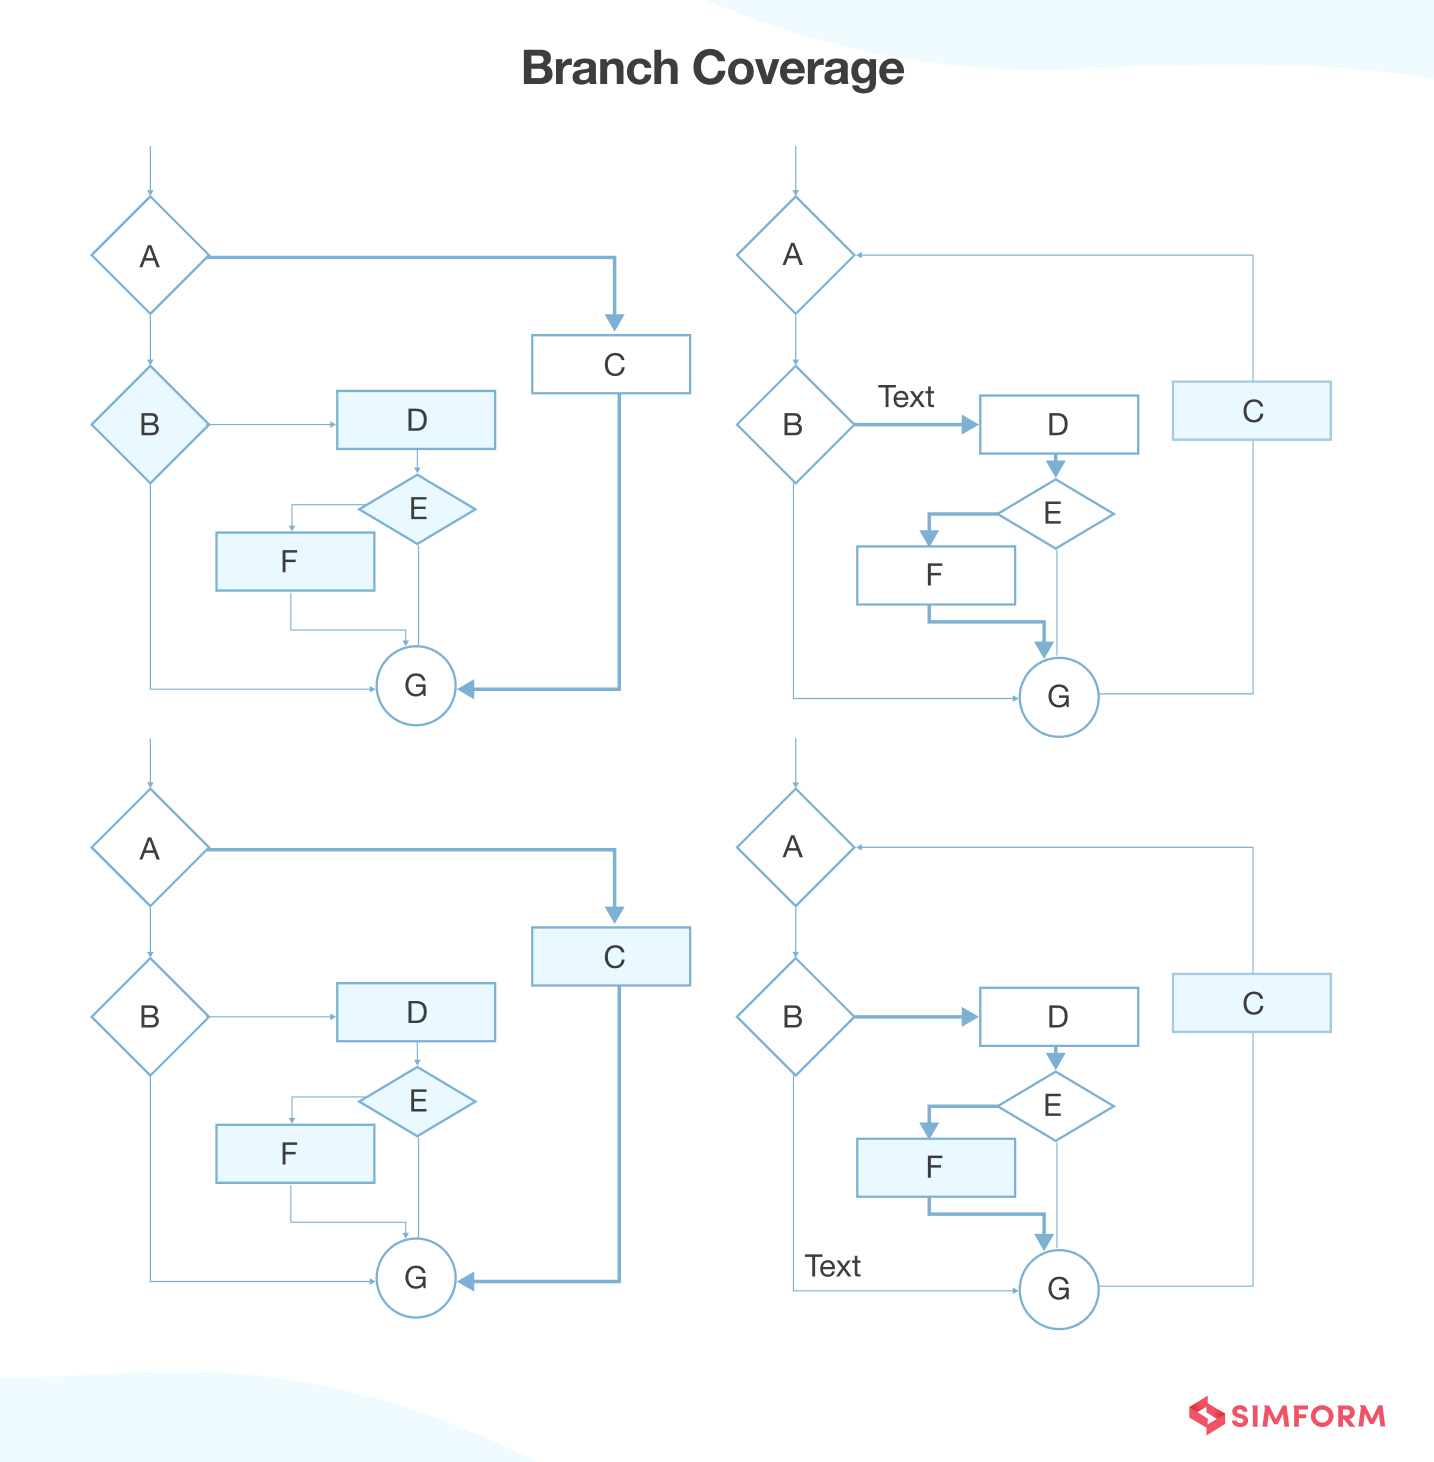
2. Branch Coverage: The test case gets designed to traverse each branch at least once from all decision points. In a flowchart, each edge must get traversed at least once.
3. Condition Coverage: All individual conditions must get covered. For example:
READ X, Y
IF(X == 0 || Y == 0)
PRINT ‘0’
#TC1 – X = 0, Y = 55
#TC2 – X = 5, Y = 0
4. Multiple Condition Coverage: All possible combinations of expected outcomes of conditions get tested at least once. For example:
READ X, Y
IF(X == 0 || Y == 0)
PRINT ‘0’
#TC1: X = 0, Y = 0
#TC2: X = 0, Y = 5
#TC3: X = 55, Y = 0
#TC4: X = 55, Y = 5
5. Basis Path Testing: Control flow graphs get made from source code or flowchart, and then you calculate cyclomatic complexity to define several independent paths. You design the test cases covering each path based on those independent paths.
Example:
Suppose you’re testing a registration page on an e-commerce website. The white-box testing here means checking whether all the main functions or classes get checked during the execution of a registration page. Another example would be using a calculator. Here, white-box testing means checking the internal workflow of a calculator and how the output gets calculated.
Black-Box Testing
Black-box testing is software testing where you have no prior knowledge of the system’s internal workings. Software testers provide input and observe the output generated by the system. It makes it possible for testers to know how the system responds to expected and unexpected user actions, response time, usability, and reliability testing issues.
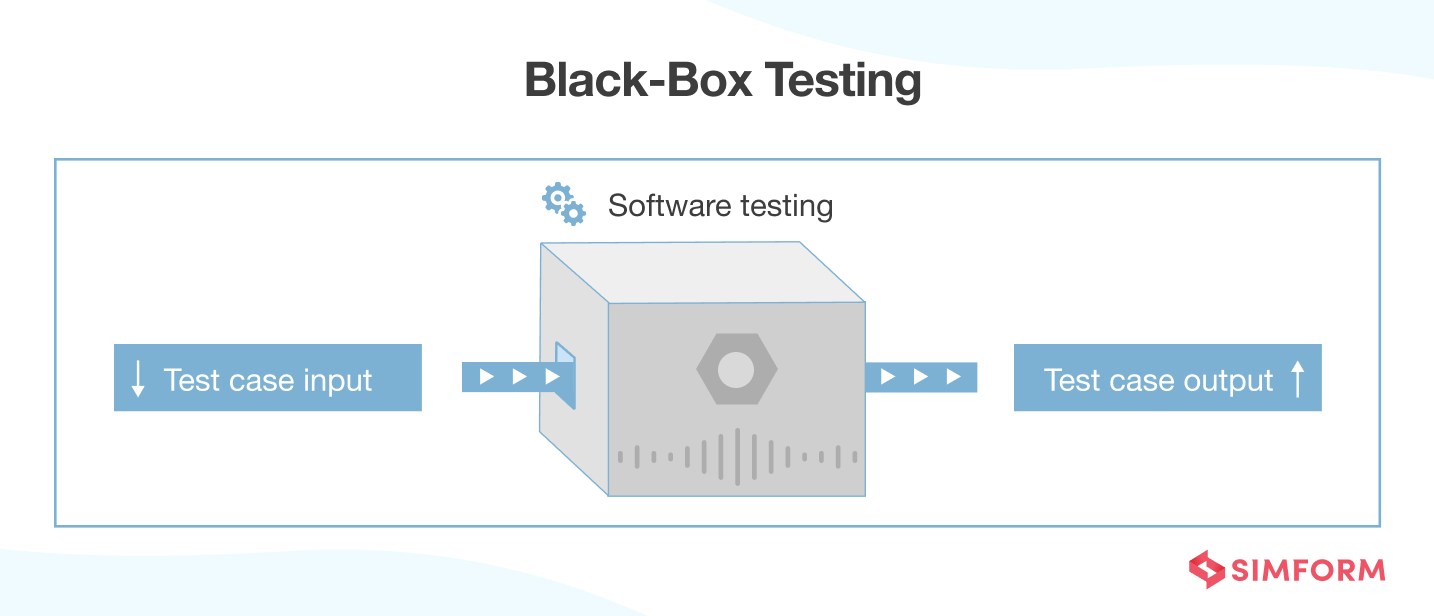
The end-user is not interested in knowing the system’s architecture or code. They only want to receive an appropriate response to their request. Testers can simulate such user activities with black-box testing and know whether the end user’s requirements get fulfilled.
There are the following steps involved in a typical black box testing procedure:
- Initially, examining the system’s requirements and functional specifications.
- Tester conducts positive and negative testing to check whether the system can process valid and detect invalid inputs.
- Tester determines the expected outputs of all the inputs.
- Design test cases with selected inputs.
- Executes test cases with a test case management tool and compares actual output with expected outputs.
- Fix the defects and conduct re-testing until no errors get found.
There are five powerful techniques for black-box testing:
1. Equivalence Partitioning: Testers divide possible inputs into various groups and test only one sample from each group. For example, a system requires the birth date and generates one kind of output for all the values above 18 and another for all those below 18. So, you can check one value from the “under 18” group and one from the “over 18” group. It would be sufficient.
2. Boundary Value Analysis: In boundary value tests, testers can identify if a system has a specific response for a certain boundary value. For example, a specific field accepts values between 0 and 99. Testers can take values like -1, 0, 100, etc., to conduct specific tests and verify if the system detects correct and incorrect inputs.
3. Decision Table Testing: Many systems provide outputs based on conditions. Testers can identify “rules,” a combination of conditions, output for each rule, and design reusable test cases for each rule. For example, a health insurance company may provide different premiums based on the age of the person (over 40 and under 40) and whether they’re a smoker. It generates a decision table involving four rules and four outcomes.
| Condition | Rule 1 | Rule 2 | Rule 3 | Rule 4 |
| Under 40 | False | False | True | True |
| Smoker | False | True | False | True |
Possible Outcomes:
| Premium Possibility | Rule 1 | Rule 2 | Rule 3 | Rule 4 |
| 1. High Premium | YES | |||
| 2. Medium Premium | YES | YES | ||
| 3. Low Premium | YES |
So, four rules would be sufficient to test the system.
4. State Transition Testing: In some systems, significant responses get generated when there’s a state change. A typical example is the login mechanism which allows the user to authenticate but, after some attempts, transit to a different state, locking the system.
If testers can identify a state transition mechanism, they can design right test cases. For example, a system locks after five unsuccessful attempts and would have a test case that checks what happens at the sixth attempt.
5. Error Guessing: It checks common development mistakes while building a system. For example, testers can check if developers have handled null-value expectations, sanitized inputs, or placed proper validation for text boxes. Error guessing comprises testing activities that identify software vulnerabilities affecting the system.
Apart from these five techniques, an exploratory testing session is also a key black-box testing technique you can explore for future software engineering projects.
Example:
A typical example of black-box testing is attempting to log in to new apps. For this purpose, the various test cases developed would be:
Production Testing
Production testing is about testing any new feature or code changes in the production environment instead of staging. It allows testers to know whether a particular feature change or update will get received well by the end-users. Production testing session enables you to follow the continuous development and delivery model, which is the need of the art in modern times.
You must introduce product testing early into the software development life cycle. It allows you to detect any bugs or errors at the earliest before the product goes into a production environment for a final release. So, production testing eliminates the risk in the deployment phase and promotes the frequent release of the product.
There are two ways through which you can conduct production testing:
1. A/B Testing: The aim is to create two versions of the web application or features and release them to end-users to check which works best. For example, some changes get made in an e-commerce website cart. To check whether those changes lead to a higher checkout ratio, you should release two versions of the checkout page.
Version A would be the original version, meaning no modifications to the cart, and Version B would be the one released with the latest changes. A/B testing would check the checkout ratio for both versions and provide you with the data of which one works best.
2. Continuous Monitoring: With continuous monitoring of the production environment after deploying software, you can identify issues that can occur in front of end-users. For example, the web page running well in the staging environment may lead to slower loading time in the production environment. So, continuous monitoring of the production environment will provide accurate insights about whether the product will work for end-users.
Example:
Suppose you’re considering releasing a new UI of the product. Production testing comes into play as you release the new UI using the feature flagging mechanism, where we turn on the new features in front of end-users when we become confident about it. Here, we will take a 20/80 split where we release the feature in front of 20% of users and gather their feedback. If the feedback is positive, we will release the feature to the rest of the users. However, if some improvements are required, we’ll work on them before releasing the feature to 80% of people.
Alpha Testing
Alpha Testing is a software testing technique that helps testers to identify bugs for launching the software to end-users. It’s a type of acceptance testing that aims to refine the product by identifying and fixing even the tiniest bugs before they go to the production environment.
Typically, alpha testing is conducted by some of the people in the organization. It comes after the unit testing, integration testing, etc. Alpha testing can work as white-box or black-box testing according to the organization’s requirements.
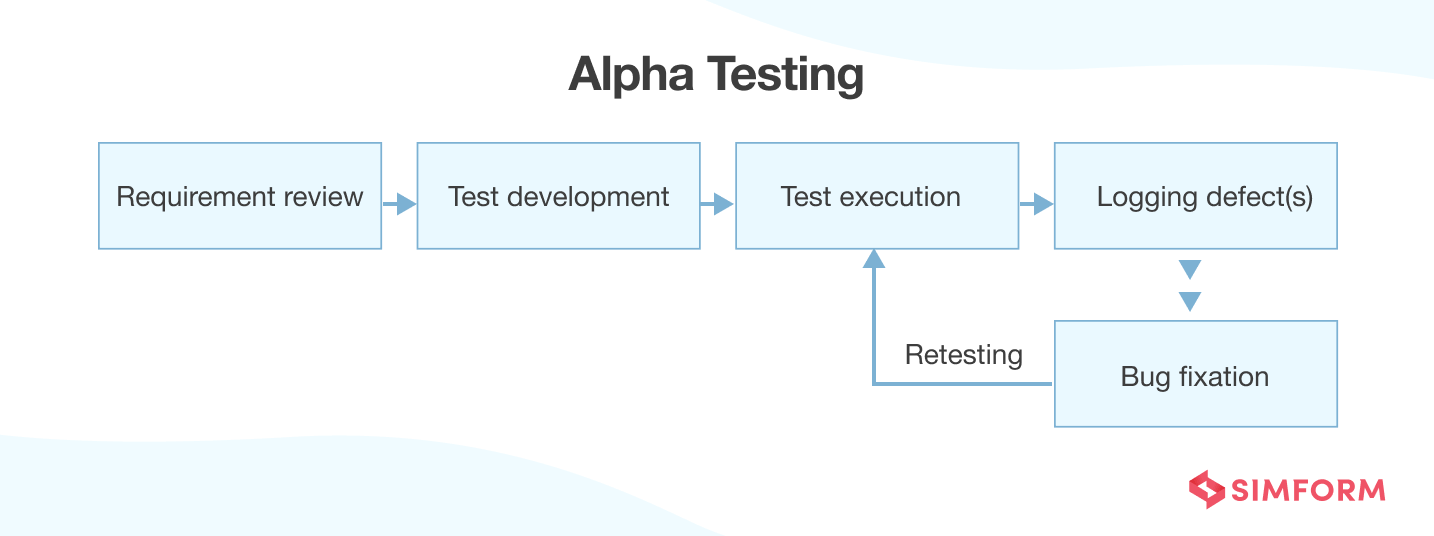
Alpha testing follows a six-step process:
1. Requirement Review: Tester reviews the functional requirements and design specifications.
2. Test Development: Testers develop a comprehensive test plan involving various stages and test coverage based on the requirements gathered.
3. Test Case Design: Once the testing roadmap gets finalized, you develop and execute test cases for various inputs.
4. Logging Defects: Observe the test cases to find out the defects and log them for further analysis.
5. Bug Fixation: After discovering the defects, testers send them to developers working on them to fix the tiniest error.
6. Retesting: When all the issues get resolved, you re-test all the test cases to verify that no more errors exist in the product.
There are two phases involved in alpha testing:
First Phase: In-house software developers conduct the first testing phase. Here, the software developers use a hardware or hardware-aided debugger to detect the bugs. During alpha testing, testers tend to find a lot of bugs, crashes, missing features, etc.
Second Phase: The second phase involves quality assurance staff performing alpha testing using black-box and white-box testing techniques.
Example:
Suppose a software company has made a web application for a travel company called Airbnb and wants the web application to handle more than 2000 users simultaneously without performance degradation. The role of alpha testing comes into play to check whether the web application can control such an amount of load. The software company can create 2000 web application logins and give them to their in-house staff. The in-house team will check the web application and identify performance issues. The software company can work on those issues before the final release.
Beta Testing
Beta Testing is a type of user acceptance testing where the product team provides a nearly finished product to a group of targeted users to evaluate its performance in a real-world scenario. There is no standard for how a typical beta test should look and how to set up a beta test. The procedure should be relevant to your organizational goals.
However, there are a few things you need to keep in mind when conducting beta testing:
- The product should have all the features wholly developed.
- The product should be stable.
- Test participants should be a part of the product’s target audience.
- Test participants should test the product in a real environment.
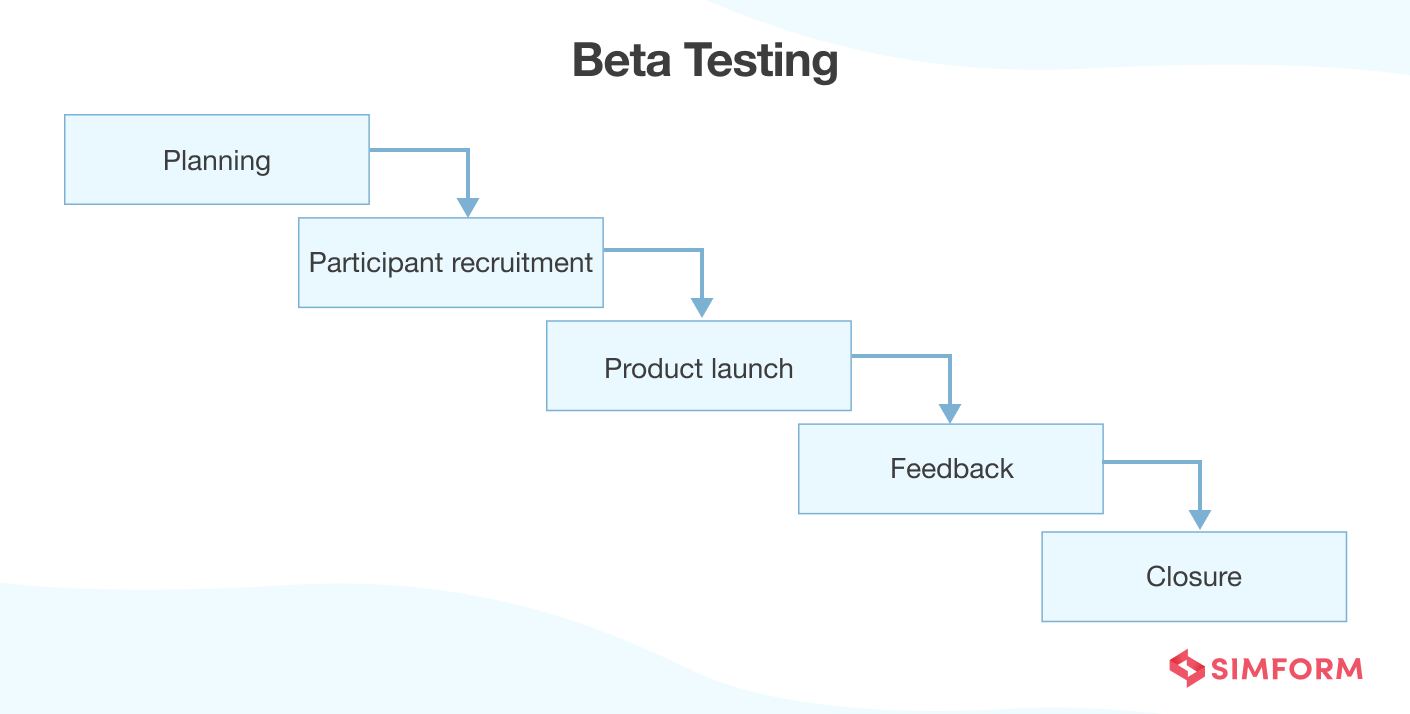
A typical beta testing procedure comprises five steps:
1. Planning: The testing team prepares a strategy and goal for the testing. The team also identifies needs, duration, and other necessary details related to the beta testing.
2. Participant Recruitment: The team selects a group of targeted users that will conduct beta testing. Those users can be according to the requirements of a particular organization.
3. Product Launch: When the targeted user gets decided, the beta version gets launched on the client side, allowing users to conduct beta testing.
4. Collect and Evaluate Feedback: Once the user finishes the testing procedure, developers will collect and analyze the feedback received from the QA team. Based on the feedback, developers will work on bugs and issues identified before the product goes to production.
5. Closure: When all the problem gets resolved, and the organization meets the initial requirements, they declare the beta testing achieved and closes the process.
You can conduct seven significant types of beta testing:
1. Open Beta Testing: It comprises many people testing the product before the final release. Open beta testing emerges as a viable option when an organization publishes the product before the final release to gather maximum feedback.
2. Close Beta Testing: It comprises selected people recruited by the organization to conduct beta testing. The software product is not open to the public.
3. Traditional Beta Testing: Software products get released to the target market, and feedback is collected. Based on the feedback, developers improve the product.
4. Public Beta Testing: The product gets shared with the public through various online channels or communities. The feedback gets gathered, and changes get made to refine products.
5. Technical Beta Testing: The product gets delivered to internal groups of the organization, which provide feedback to improve the product before the final release to end-users.
6. Focused Beta Testing: The product’s specific feature gets launched to end-users to know whether it works well. Feedback gets collected about the feature, and improvements get made before releasing the final version.
7. Post-Release Beta Testing: The product gets launched to end-users. Feedback, reactions, and suggestions get gathered for the future release of the product.
Example:
Suppose a software company has developed a web application for railway booking and wants to check if the booking/cancellation feature works correctly. For that purpose, they will conduct beta testing of the web application by making it public to end-users. The end-users will use the application and provide feedback or suggestions. Developers will make finer refinements based on that feedback or suggestions before launching the final version.
Conclusion
At Simform, we believe that functional testing plays a crucial role in transforming client’s understanding of customer needs into applications that meet their requirements. Releasing applications with serious functional shortcomings can lead to disastrous consequences. When all the above functional testing types are performed at the right time in the development process, functional testing ensures the delivery of a quality product. Know more about our Software Testing Services.

Priyanka
Very helpful
Shiva
One of the short and brilliant explanations.
Mukhaddar Shaik
Thank you so much for the above info Sir. Very concise and crystal clear.
dipti dilpak
This is very useful information Thanks for sharing this information
Pooja
Condensed and informative. Thanks!
Duncan Haywood
Hi Hardik, Thank you so much for writing this well thought out and thorough explanation. You have helped me greatly in adopting good practices for my own testing. Much thanks, Duncan Haywood
Hardik Shah
We're glad you found the information useful.
Lakshmi
Very useful and clear information. You have explained it neatly with the diagrams. Thanks.
William Hruska
Nice article.
Mosheen
Thank you for such great post.
April
Excellent explanations!
Pooja
It's so easy to understand from other sites. Nicely mentioned and described the things.perfect points
niya
good one
Ganesh Chenna
Great explanation
Prasanna
Very Useful and clear.Thank you
vijayalaxmi
Clear and accurate information.Thank you
VENKATESH Uppeti
Can u provide complete detail notes on manual testing with example sir
Vinay Arun Bongale
Very Short and to the point explanation. Very Nice!!!
Hezekiah
Very helpful, thanks.
Fatmah
good explanation. helpful article. thanks
Shiv Singh
Very Nice Post. Thanks a lot for sharing it
Yasser
Very Helpful - Update the image on replacing "Interface Testing" with "Integration Testing"
Hardik Shah
Glad you liked it, Yasser, and thanks for pointing out. We have updated the image.
Tee
Great job putting them together in an easy to understand form