Serverless Architecture- the term added to the technology stack a few years ago, has become common use since the launch of AWS Lambda in 2014.
The evidence is- Raymond Camden, Serverless Developer Advocate, quotes that serverless will become ‘less of a hot new thing’ and more of a ‘just another option’, and it is becoming a reality now. One main reason is that it provocatively illustrates one of the biggest headaches of software development- server administration. In short, write your code and run your applications without provisioning or managing anything on the server side.
But is the sweet reality as good as it is promised?
Well, let’s put this question to the test as we build an e-commerce app based on serverless architecture using AWS services and stack.
Over the years, I’ve observed that many enterprises don’t know how to build such apps and ignore the massive benefits they offer due to insufficient knowledge. And that’s what I will be sharing with you in this post.
Features for Building an MVP for a Serverless E-commerce Application
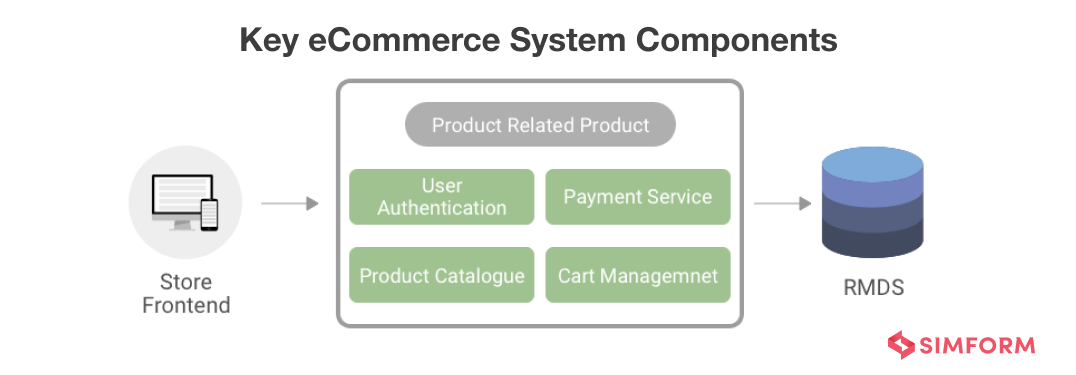
Before we jump onto architecting the tech stack for our ecommerce app, let’s discuss some of the basic features for our MVP.
-
User authentication and authorization:
The first feature that comes to your mind while you think of an ecommerce app is user pool authentication & management. The aim here is to provide a seamless registration process while demanding the least possible information.
-
Product Catalog:
This consists of a product catalogue which will display the product list from where users can choose the product they want to buy.
-
Payment:
This is a catalyst which can increase or decrease your sales ratio. The motive here is to provide multiple payments options with ease in process and the tight layer of security.
-
Shopping Cart:
A shopping cart is an essential feature for an e-commerce app where users will be able to add the product of their choices and place an order.
-
Customer Support:
Customer support is an inevitable feature to run a successful business. For this, you can either leave your contact details within the app or you may integrate a chatbot which will work based on instant messaging.
Apart from this, if you’re planning to outgrow your competitors, here are some additional features you should have a look upon:
-
Push Notifications:
This is the single most key feature which is sought after by ecommerce giants. Plus, it works as a catalyst for the exclusive promotion and special offers.
-
Shipment Tracking:
This feature tracks the status of the ordered shipment. Plus, it includes keeping the users updated by sending out SMS and email about the product delivery status.
-
Comparison Feature:
This feature let users compare different product based on a fixed set of multiple values. For this, you will have to make another cart namely ‘Comparison Cart.’
Getting Started With Monolithic First Approach
According to Martin Fowler, there are two common software architecture patterns to approach microservices. Here are they:
- Most of the successful microservice stories start with a monolith which scales up to a level and then breaks up into microservices.
- Most of the development teams who started building their system with microservices have ended up in serious trouble.
When you begin building an application, there are a lot of uncertainties starting with how useful it will be for users. It may be hard to scale a system which is poorly designed but successful. However, that’s still a better option than being in the reverse situation.
And hence, it is always recommended to start with a simple version or MVP and test how well it is working out. And the add new functionalities in the form of microservices. Following this advice, here’s how what our MVP should consist of.
- Authorization — responsible for authorizing/managing a user
- Presentation — responsible for handling HTTP requests and responding with HTML or JSON/XML
- Business logic — the application’s business logic
- Database layer — data access objects responsible for accessing the database
- Application integration — integration with other services (e.g. via messaging or REST API). Or integration with any other Data sources
- Notification module — responsible for sending email/push notifications wheneverneeded
Why Serverless Architecture?
Six years ago, Walmart Canada failed on Black Fridays for two years in a row. It’s IT Department came across a multi-million dollar question since the ageing architecture started affecting their business negatively!
Serverless architecture offers automatic scalability, reduced operational overhead, and pay-as-you-go pricing, making it an efficient choice for building and deploying applications without managing server infrastructure.
But these are not the only reasons to go for serverless architecture, there are a few more:
Enhanced scalability:
Everyone expects their app to be the next Amazon. But if that happens, is it prepared to handle the load? Provisioning instance is a big risk- but so is being unprepared when success strikes. With serverless architecture, the sky is the limit and you don’t have to decide anything about scaling. One online program scaled to 50,000 users within six months without provisioning any servers.
Pay for what you use:
Serverless computing saves money in terms of computing power and manpower both. First, you save by deleting all together with your infrastructure management staff and secondly, you pay only when your servers are running. No extra cost for idle time!
Decreased time to market:
If your competitor got it first, you lose! That’s a simple economy of the consumer market. Serverless architecture allows developers to add new functionalities in hours and days instead of weeks and months. Few examples consist of apps that rely on third-party APIs for services like authentication (0Auth), social (Twitter), map (Mapbox), AI (IBM Watson) and more.

Characteristics of Microservices
Before we move further adding new functionalities to our MVP, let us understand what makes a good microservice.
Loose Coupling:
One of the key features of what good microservices consists of is loose coupling. What this means is, a change in one service should not require a change in another. Because that’s the whole point of microservice, being able to change one service without needing to change anything to the other one.
For example, payment service and cart management should be developed as a separate service so that both can be scaled and maintained independently.
Apart from this, one service should know minimum things about the other services it is communicating with. This suggests keeping the number of calls with a different type of services to a minimum. If this fails, we will land up with potential performance problems on the top of tight coupling.
High Cohesion:
The second key feature of a good microservice is high cohesion. This means to group microservices based on similar behaviour. Why this? Because if we want to change one behaviour, we want to do it as fast as we can without having to change the behaviour of any other region.
If it requires to make changes in lots of different places and making lots of services, it is not only slower but potentially risky! And that’s what we want to avoid at all. And hence, this recommends defining fine boundaries within your architecture which ensures that similar behaviour resides in one place while it couples with other boundaries as loosely as possible.
Identifying the Bounded Contexts
We are developing a complex microservice architecture for a complex application which is going to be a set of loosely coupled bounded context i.e. business capabilities.
Microservices provides huge benefits but these benefits can be achieved only after a careful functional decomposition of the application into bounded contexts. The idea here is that any given application consists of multiple bounded contexts which can be defined as “a specific responsibility enforced by explicit boundaries” and consists of things which do not need to be communicated externally with other bounded contexts.
How to decompose an application into business capabilities?
By defining bounded contexts corresponding to business capabilities. These can be defined as something which does business in order to generate value. It normally corresponds to a business object,
- Product Management is responsible for product catalogue
- Notification management is responsible for email/sms notifications
Considering our case of a serverless ecommerce app, we are trying to introduce customer-centric services in order to meet our business goals of customer retention. Ecommerce is an inherently complex business domain. There are interrelationships among entities like users, products, reviews, payment, tracking, etc. But where do you start?
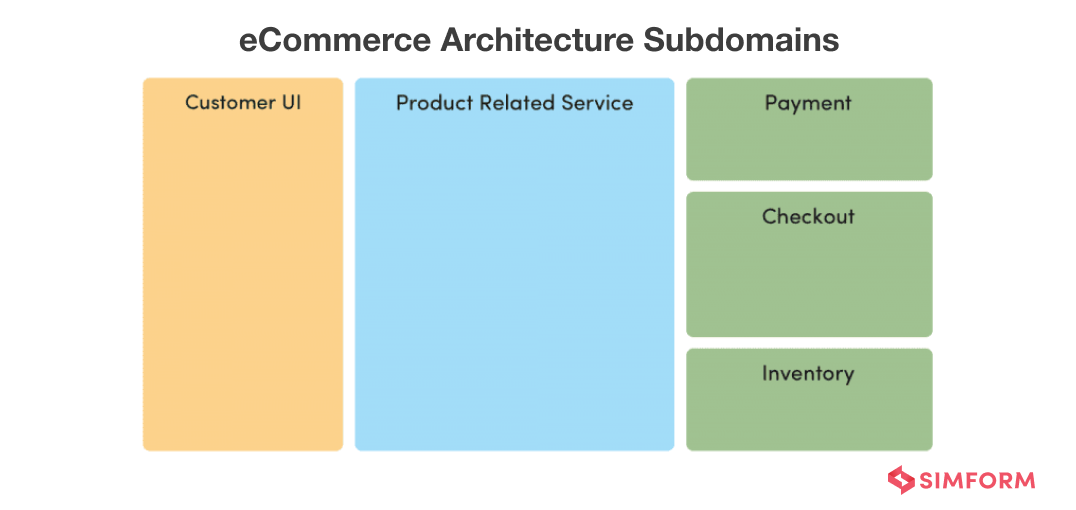
Following the Domain-driven Design (DDD) approach, we can first start by breaking the ecommerce domain down into subdomains. As a starting point, we can define our business units corresponding to the technical domain.
The business capabilities of a serverless ecommerce platform will include:
- User Management: This is responsible for user authentication and management through social gateways, manual authentication, email verification and mobile number verification.
- Content Management: This is responsible for search bar, navigation and translation services.
- Product Catalog: This is responsible for product details, product images and product reviews.
- Customer Management: This is responsible for catering facilities like personal subscriptions, saved payment methods, address verification, ship orders, customer credits and loyalty programmes.
- Cart Management: This is responsible for shopping cart management, quick order and check out.
- Payment Management: This is responsible for processing payment and fraud tracking.
- Inventory Management: This is responsible for keep tracking of back orders and pre-orders.
- Track Management: This is responsible for keep track of shipment and notifying of orders via push notifications, SMS and email.
- Reporting Management: This is responsible for web analytics, business intelligence, product sales reports and many more.
- Marketing Engine: This is responsible for personalised marketing and management of recommending products.
Designing Microservices
The Application Frontend and Product Catalog subdomains are highlighted since they are an integral part of the solution. Furthering with our DDD approach, we’ll define more bounded contexts that emerge from these subdomains.
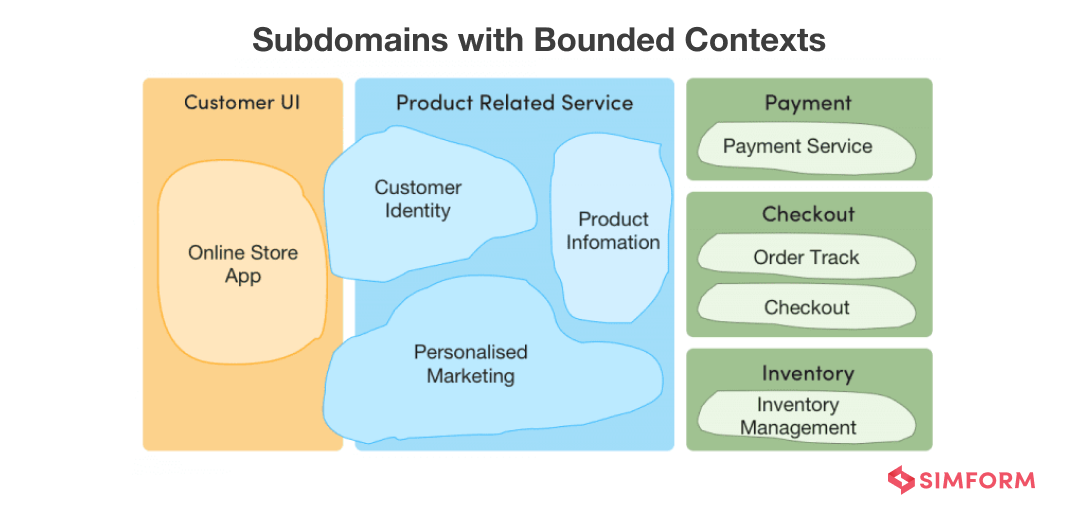
 Within the Customer UI part, two distinct bounded contexts come into play. The web and the mobile application frontend shares a common language between each other. We will call these context “Web App” & “Mobile App”.
Product Related Services is even more divided. Product information- containing the core information and images about products- forms a Product Information bounded context. Another distinct bounded context that emerges from this domain is Personalised Marketing which communicated directly with customers. Lastly, there is a Customer Identity context focused exclusively on user security and access control.
The payment subdomain dissolved into Payment Service bounded context which handles payment process, financial security and fraud tracking. Check out domain breaks down into Checkout & Order Tracking bounded context. Lastly, inventory domain dissolves into Inventory Management bounded context.
 Now that we have established the bounded contexts, we can now think about what services will make sense from the user/customer perspective. As mentioned earlier, Application Frontend part has two distinct services: Mobile App & Web App.
The Customer Identity context should provide Customer Authentication service in order to ensure that only authorised user is being able to access our services. Plus, Customer Management which will handle personal subscriptions, saved payment methods, address verification, customer credits and loyalty programmes.
The Product Information context will take care of product catalogue, product images. This will also handle product reviews. This task will be cross-referenced and will be supplied customer identity from Customer Authentication services.
The Personalised Marketing service will handle recommending products as per customer’s previous choice, preferences and purchases. It will also handle the content management service which will include navigation and translational services.
For the Payment domain, we will only refer to a single eponymous service per bounded context. The Order Tracking & Checkout will house two distinct services, first Track management which will keep track of shipment and notifying of orders via push notifications, SMS and email and secondly, Cart management which handle quick order and checkout.
Want to Build an E-commerce App using Serverless Technology?
Lastly, the Inventory domain will house Inventory management which will keep track of orders and pre-orders. And, reporting service which will be responsible for generating various reports and monitoring.
The last step in this design process is to illustrate the interactions that will take place between the services. However, we will depict them at the time of fabricating our app architecture. Before moving onto that, there is one important thing that one must keep in mind:
- Do not assume that all these services and interactions will take place in real time while servicing the end user activity. Few services will need information from a few other services, an event-based approach combined with caching could be used to ensure that its processing is self-contained in order to cater user’s request in real time.
Architecting the Serverless Ecommerce App on AWS
Now that we have built our individual microservices, it is time now to figure out our tools. All these services can leverage service discovery and will use simple mechanisms (such as HTTP) for easy connectivity from a wide variety of devices.
Considering the granularity level of serverless functions, we will depict three main portions up to the serverless level viz. Recommendation Engine, Cart Management and Payment Service. For the simplicity of representation, rest of the application will be discussed up to the microservice level.
Maintaining an e-commerce application with a heavy product catalogue is challenging. The catalogue should be searchable, and individual product pages should contain rich information including product images, pricing and reviews.
Here customers may want to find things they are interested in and expects pages to load quickly. Also, customers expect the ‘Quick Checkout” functionality to be able to make purchases any time they want.
The customer-facing user experience in you in your ecommerce workloads includes responsive web applications and optionally as native mobile applications. In combination with the backend architecture, you build your application by assembling multiple frontend components that correspond to and communicate with functions through backend APIs.
Here’s an example of how frontend of our serverless ecommerce app will work.
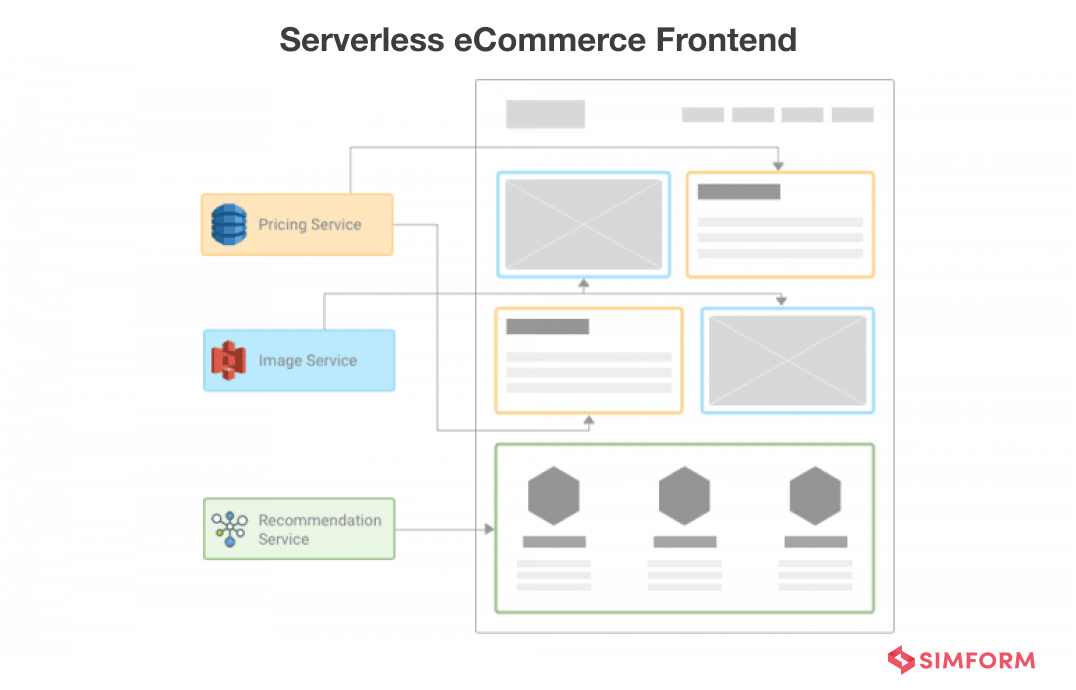 The picture shows the Product Catalogue management microservice which will use Amazon Simple Storage Service. This will accommodate all static content, such as product images, manuals and videos. The main benefit of hosting the website on S3 is that it can be replicated to multiple regions of AWS.
Amazon DynamoDB will accommodate persistent session data such as shopping cart and product pricing details. Since it is a NoSQL database, we have the flexibility to add new product categories and new attributes to our catalogue.
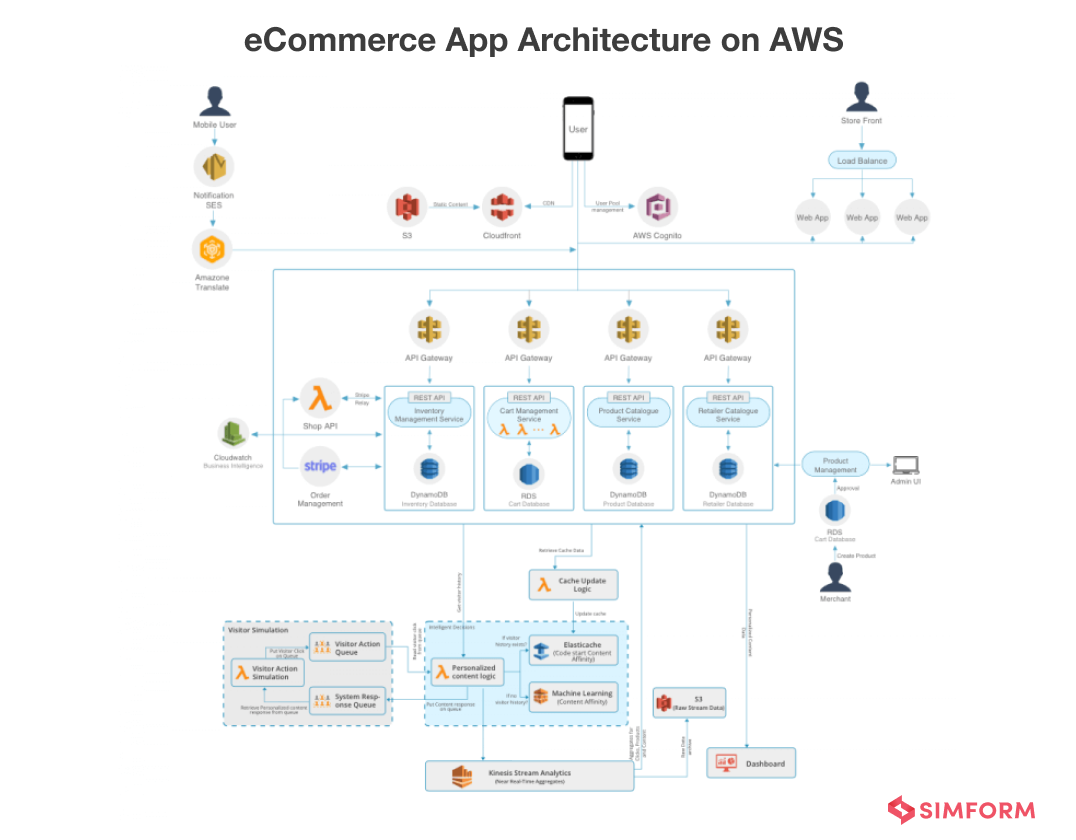 We will use Amazon API Gateway for the frontend to access the backend features and compute these functionalities either as microservice or functions (whichever we have chosen). One important reason for using multiple API Gateways is to avoid creating a single monolithic API Gateway as we scale at a higher level. More to that, single API Gateway will the autonomy provided by the microservices architecture.
The DNS requests to the e-commerce app will be handled by highly avaiable Amazon Route 53. While Amazon CloudFront is used as our content distribution network. It will cache static and streaming content with low latency from locations close to the customer.
Amazon Elasticache will be used as a session store for volatile data and as a caching layer for the product catalogue to reduce input/output and cost over DynamoDB. The Product Catalogue will be fully loaded into Amazon CloudSearch which will provide full search functionality to the customers.
Amazon Translate will be used for facilitating our app in multiple languages. For sending transactional email, such as order confirmation, to the customer, we will Amazon SES. This can be easily added with the help of AWS SDKs.
As discussed earlier, we will use functions for three main services- payments, cart management and Recommendation Engine. Rest of the microservices will be hosted on EC2 Instances while Elastic Beanstalk will automatically handle the details of provisioning, load balancing, auto-scaling and application health monitoring.
Using Serverless in our Ecommerce App
#1. Cart Management
The Cart Management business functionality will make use of 5 functions:
- ADD (Function 1): This will be triggered when a user adds a product into their cart.
function getProductData(profile_id,cb){
var params = {
TableName : TABLES.productData,
KeyConditionExpression: "#id = :profile_id",
ExpressionAttributeNames:{
"#id": "profile_id"
},
ExpressionAttributeValues: {
":profile_id": profile_id
}
};
docClient.query(params,function(err,data){
if(err){
console.log('err in getProduct');
cb(err,null)
} else {
cb(null,data.Items);
}
});
} - DELETE (Function 2): This will be triggered when a user deletes a product from their cart.
function deleteProduct(id,product_id,cb){
var params = {
TableName: TABLES['productCatalog'],
Key:{
id,
product_id
}
};
docClient.delete(params,function(err,data){
if (err) {
console.error("Unable to delete item. Error JSON:", JSON.stringify(err, null, 2));
cb(err);
} else {
console.log("DeleteItem succeeded:", JSON.stringify(data, null, 2));
cb(null);
}
});
}- QUANTITY(Function 3): Whenever the number of product quantities will be updated, this function will be triggered.
- UPDATE (Function 4): This function will be running at a set interval of time to make sure that the products added in the cart are available in the warehouse. If not, it will automatically delete them.
- CHECK OUT (Function 5): Once the order is confirmed, this function will be triggered which will initiate the payment procedure.
#2. Payment Management
For facilitating the payment system, we will use Stripe Relay and Stripe Checkout. The function level granular architecture of serverless payment system will look something like this:
- Once the user creates an order, the app will provide order details to Stripe.
- After confirming the product availability in the Inventory (DynamoDB), Stripe confirms the order and returns with the order total to the user.
- Once the order is confirmed, an AWS Lambda function will be triggered which will load Stripe Checkout over a secured HTTPS URL.
- Once the user provides the payment details, Stripe indicates the payment result to the user.
Accepting the card payment with Stripe is a two-step process which works on client-side and server-side both:
- From the user’s browser, Stripe securely collects the user’s payment details and returns a representative token which is then submitted by the browser to the app’s server.
- Once the request is submitted, an API request is sent which triggers a Lambda function which will create a charge and complete the payment.
Step 1: You can securely collect the payment information with Checkout. It combines with the HTML, JavaScript and CSS to create an embedded form as shown below. To get started, add the following code to your secure payment page and makes sure that your code submits to your own server-side code:
<form action="your-server-side-code" method="POST">
<script
src="https://checkout.stripe.com/checkout.js" class="stripe-button"
data-key="pk_test_6pRNASCoBOKtIshFeQd4XMUh"
data-amount="999"
data-name="Stripe.com"
data-description="Example charge"
data-image="https://stripe.com/img/documentation/checkout/marketplace.png"
data-locale="auto"
data-zip-code="true">
</script>
</form>
Step 2: Once a token is created, your server-side code will trigger a Lambda function through API Gateway to create a one-time charge. This request contains the token, currency, amount to charge and any additional information you want to pass.
Our Lambda function will look something like this. It is written in Node.js
// Set your secret key: remember to change this to your live secret key in production // See your keys here: https://dashboard.stripe.com/account/apikeys var stripe = require("stripe")("sk_test_BQokikJOvBiI2HlWgH4olfQ2");// Token is created using Checkout or Elements! // Get the payment token ID submitted by the form: const token = request.body.stripeToken; // Using Expressconst charge = stripe.charges.create({ amount: 999, currency: 'usd', description: 'Example charge', source: token, });
Tokens can be only used once and every time the user purchases something, he/she will have to re-enter the details.
However, Stripe allows multiple payment solutions like saving the card details, payment through bank, refunds and much more. You may check out their documentation here for adding further functionalities to your payment mechanism.
#3. Recommendation Engine
The main aim of developing a recommendation engine is to facilitate each user with content based on unique interests of each visitor to boost user engagement and improve user conversion, lifetime value and retention.
The recommendation engine will use the following data:
- Actions: This will include user clicks, visited products and products categories. This will help in constructing an accurate model and make better content recommendation.
- Behaviours: This will include users’ past preferences and information from which predictive models will learn more about their preferences.
- Demographic Information: This will include user-specific information such as gender, age, etc. which will help in prediction as users with similar background tends to have similar choices.
The recommendation engine uses AWS Lambda for processing users’ actions as mentioned above. It extracts events from multiple sources. As soon as the event occurs, it triggers a specific Lambda function attached to it which process the event further.
Once the event is processed, it checks for users’ history in DynamoDB which is used to store aggregated data of clicks by the user, product and preferences as well as user profile information.
If the users’ history exists, machine learning through predictive analysis determines the content affinity scores and passes the information to Kinesis Stream.
* Content affinity scores are used with the personalised logic to determine the most relevant content to present to the user.
ElastiCache is used to store pre-computed cold-start content affinity scores. This stores the logic for the users who have no history, means they are visiting for the first time. While Machine Learning helps us in easily designing, test, operationalize and manage predictive analytics solutions due to its API-driven architecture.
Once the events are processed, they are fed to Kinesis Stream which aggregates clicks in near real-time by the user, product choices, preferences and demographic information to write to DynamoDB. It also archives the raw click-stream data to S3.
Maintaining the Data Consistency
Since microservices are architectured with ‘Database per Service’ philosophy, maintaining the data consistency is highly critical. Especially considering our case of an ecommerce app, there are going to be multiple services that need to ensure data consistency across services.
When you’re working with microservices, things are quite complicated. Since microservices has its own database, you can no longer use two-phase-commits to have database consistency across your system.
Let’s take an example: whenever a user places an order over an online store, charging the customer, sending the confirmation, updating the stock and sending it out to delivery doesn’t happen in a single ACID transaction. To execute the above scenario, you’ll be required to create a distributed transaction.
What’s the solution?
Well, we will implement each business transaction that spans across multiple services as a Saga.
Saga can be defined as a sequence of local database transaction updates the data within each service database. The first trigger will be an external one while the subsequent triggers will be initiated by the completion of the preceding service.
For implementing a saga transaction, we will you the method of events/orchestration. In this method, there is absence of central coordination. The first service initiates a transaction and then publishes an event. Further, this event is listed by the next service which executed a local transaction and publish an event, depending upon the requirement.
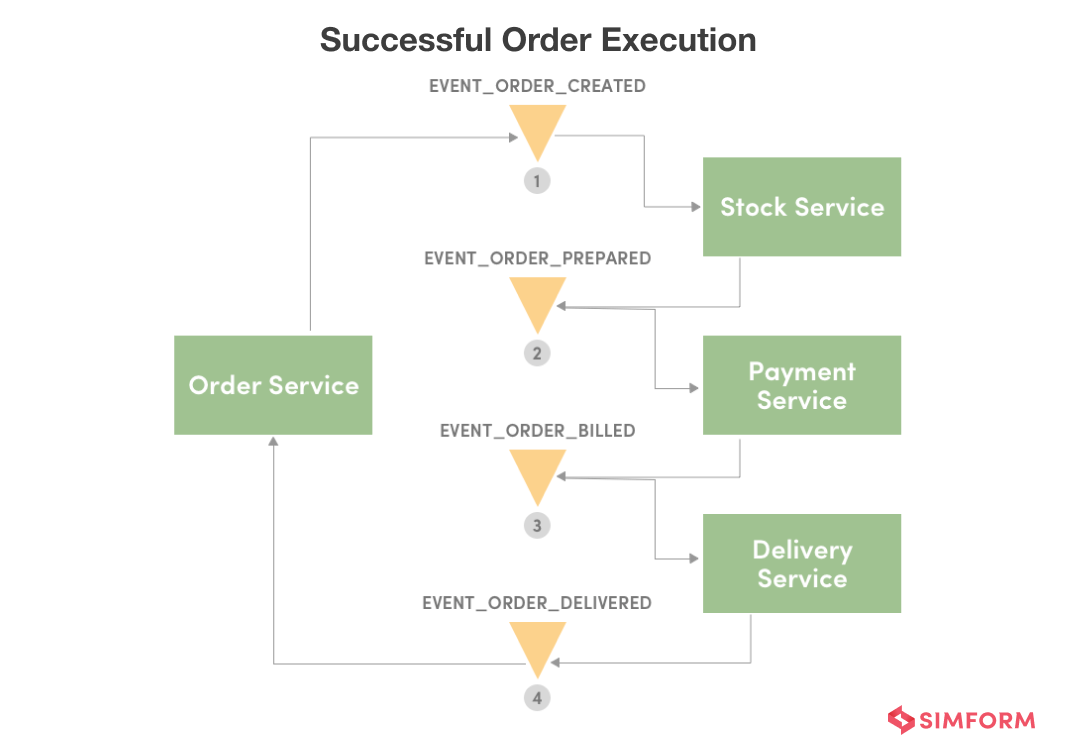
- Once the order is placed, the order service saves your order with a pending state and publishes this event- EVENT_ORDER_CREATED
- The inventory service listens to the event- EVENT_ORDER_CREATED, prepares the order after verifying with the stock available, update it and publish the next event- EVENT_ORDER_PREPARED
- The payment service listen to the event- EVENT_ORDER_PREPARED, bills the customer and publish the next event- EVENT_ORDER_BILLED
- Delivery service listens to this event- EVENT_ORDER_BILLED, will pick up products from the warehouse and deliver the product. Once the product is delivered, it publishes the next event- EVENT_ORDER_DELIVERED
- In the end, order service, which initiated this transaction, listen to EVENT_ORDER_DELIVERED and concludes the order state as finished.
If at all, during this transaction, a business rule is violated, then the saga executes a series of compensating transactions to undo any preceding changes. Here’s an example, what if payment fails?
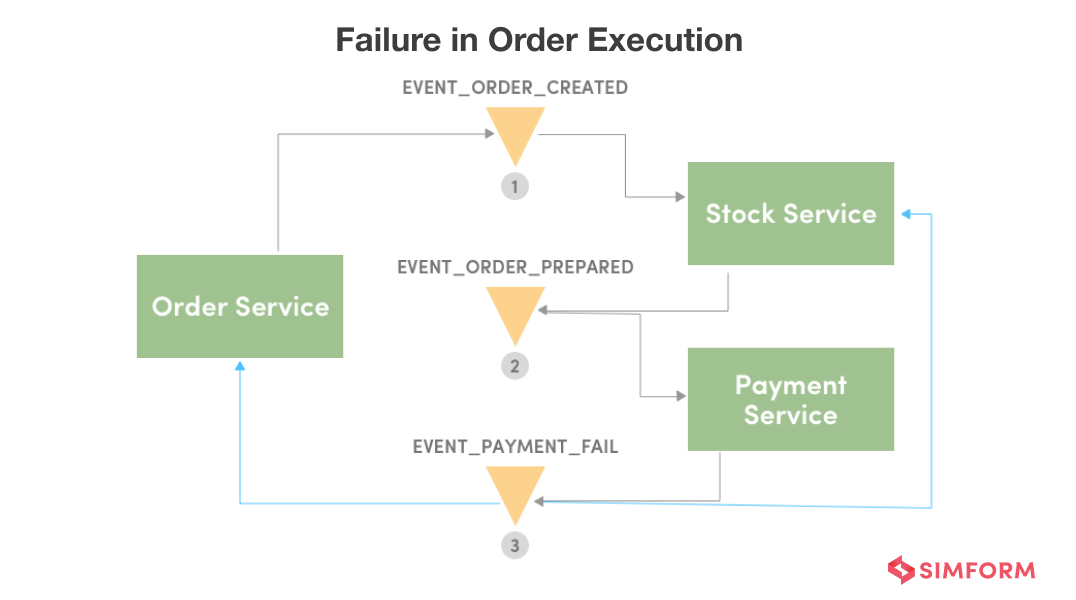
- If the payment service fails to execute successfully, it will produce an event- EVENT_PAYMENT_FAIL
- The preceding event- EVENT_ORDER_PREPARED and EVENT_ORDER_CREATED listens to this and terminates the created order.
The flexibility, independent scalability, event-driven nature and strong encapsulation in serverless architecture makes it a perfect choice for building an e-commerce application. But successful implementation of serverless for e-commerce app will require a minimum level of expertise and maturity in terms of function observability, monitoring and automation.
Harness the serverless potential to build a successful eCommerce app
The emergence of serverless architecture has transformed from a mere addition to the tech stack to a prevalent choice since the introduction of AWS Lambda, with some notable examples. It’s gradually transitioning from a trend to a standard option.
In a changing digital world, going serverless provides scalability, cost-effectiveness, and quicker time-to-market. A serverless architecture tackles server administration issues, letting developers concentrate on coding. Yet, a skilled touch is needed for a functional serverless eCommerce app.
Ready to leverage this innovative approach for your eCommerce development? Our experienced team specializes in crafting serverless eCommerce solutions that drive success. Check out some prominent use cases that showcase use expertise.

Sasirekha
Very informative and if you have source code please share
Jason
Rohit this is a great guide thank you! One question - for the Order Event Saga, could we use an AWS Step Function to accomplish this? Thanks again!
Klauss
Quite a guide indeed. Would you be able to publish the code as well? Kind regards