If you are new to IOTA, go through our introduction of building Industrial IoT with IOTA to understand various underlying concepts.
Our first IOTA implementation PoC was all about building a public facing service that allows users to unlock and gain access to a locker. This locker has a doorknob, that will only turn on if the device requesting the access, is authenticated. We have started using IOTA in other IoT product development projects.
Note: We have used three tags in this implementation. Two of them turns on and off a LED, the last one rotates the motor:
- TURNONLED999999999999999999
- TURNOFFLED99999999999999999
- TURNONSERVO9999999999999999
The steps to configure your IOTA based PoC are:
Step 1: Create Seed
This will be mainly used to login to IOTA Wallet. It is ideally 81 characters long and its Latin characters of 9.
Caution: You should only use this seed generator to get an idea of what a seed looks like. We in no capacity would recommend anyone to use an online seed generator for a production or pilot project. There are many who have been scammed of their IOTAs because they used online seed generators for actually generating seed for their nodes. We will shortly put an offline seed generator that you can safely download and execute on your own local environment.
Step 2: Generate address
All the transactions are performed through address
Step 3: Add sender’s address and iota amount
It is ideally 81 characters consisting of Latin characters.
Step 4: IOTA node
This is where all transactions take place. It should be public and fully synced
Step 5: Add neighbors
For each transaction to be carried out, it requires 2 nodes to approve it. Hence, it requires adding at least two neighbors. Having 7 to 9 neighbors which are running 24/7 is advisable, but more than 9 neighbors would not be good, as they would increase the load on the node.
Step 6: Start listening
A Python script running on the background performs an action based upon the transaction tag it receives.
Let’s divide building an IOTA proof of concept into two different parts:
- Part 1 – Implementing IOTA node
- Part 2 – Enabling IOTA’s API and device registration with the Tangle
Implementing a full IOTA node on Azure
For a full node IOTA setup, the following is required:
- A VPS server with Linux/Debian based Operating system. It should support system
- RAM: Minimum 2GB, 4GB of RAM is recommended
- Free space: 10GB
- Storage: SSD is preferred
- Static IP Address (Usually all VPS providers have a static IP)
We decided to go for Azure as our cloud.
Installing dependencies on Azure
First, let’s keep our system to the latest updates by
sudo apt-get -y update
Installing other dependencies
sudo apt-get -y install wget
Follow this link from DigitalOcean to install JDK 8 on your server.
Download IRI’s latest jar file from Github: https://github.com/iotaledger/iri/releases
Installing IRI on the server
On your terminal, run the following commands:
mkdir -p /opt/iota && cd /opt/iota
wget -O IRI.jar https://github.com/iotaledger/iri/releases/download/v1.3.2.2/iri-1.3.2.2.jar
Setting up IOTA.ini on the server
To setup IOTA.ini:
Run vim /opt/iota/iota.ini
And add the following in the iota.ini, save and exit it.
[IRI] PORT = 14700 UDP_RECEIVER_PORT = 14600 TCP_RECEIVER_PORT = 14265 NEIGHBORS = udp://example.neighbor1.com:14600 udp://example.neighbor2.com:14600 udp://iota.neighbour3:14800 IXI_DIR = ixi HEADLESS = true DEBUG = true TESTNET = false DB_PATH = dbIn the above information, you can add neighbors if you already have them. Else, you can modify it later as well.
Note: In case, if you don’t have any neighbors, you can subscribe to the IOTA’s slack and join the #nodesharing channel. In order to make a neighbor, you and your neighbor both need to add their IP in your node.
Setting up IOTA’s systemd service
First do vim /etc/systemd/system/iota.service
Then, add the following to your iota.service:
[Unit]

Description=IOTA node

After=network.target

[Service]

WorkingDirectory=/opt/iota

ExecStart=/usr/bin/java -Xmx4g -jar IRI.jar -c iota.ini --remote-limit-api "removeNeighbors, addNeighbors, interruptAttachingToTangle, attachToTangle, getNeighbors" --remote

ExecReload=/bin/kill -HUP $MAINPID KillMode=process Restart=on-failure

[Install]

WantedBy=multi-user.target

Alias=iota.service
Note #1: You might have to change the “-Xmx4g” parameter to change the RAM memory allocated to the IOTA node. Here, “4g” stands for 4GB of RAM.
Note #2: Initially it is advisable to restrict some of the API access to prevent your Tangle from being attacked from outside. For those who are starting a new node and are synchronizing for the first time – add the following to your iota.ini’s configuration:
P_REMOVE_REQUEST = 0.0
By default, P_REMOVE_REQUEST has been set to 0.03, which means that 3% fo all requests for missing transactions are constantly removed from our request queue.
Observation: My suspicion falls on the default P_REMOVE_REQUEST values. It might contribute towards the difficulties to achieve a full working node.
Once your node is properly synced, you can remove the line and restart IRI
Running the IOTA node on server
To run the code on your IOTA server type the following commands:
systemctl daemon-reload && systemctl restart iota
systemctl status iota
Adding and removing neighbors on your IOTA node
To add or remove neighbors on your IOTA node, just add or remove the address from /opt/iota/iota.ini and restart the IOTA server using the following commands:
systemctl daemon-reload && systemctl restart iota && systemctl status iota
Try adding 7 to 9 24×7 active full nodes and you will be ready to integrate your IoT devices with IOTA.
Checking IOTA connection
To check the connection, type the following:
curl http://localhost:14700 -X POST -H 'Content-Type: application/json' -d '{"command": "getNodeInfo"}' | python -m json.tool
Note: During the initial stages, IOTA node will try to synchronize with all data from the Tangle, it may take some time to fully synchronize.
Now, you have a full IOTA node successfully set up. The next part details about integrating a public facing service with
Updating IOTA nodes to a newer version
To update your older IOTA nodes, replace the old IRI.jar file from your server and restart the IOTA service.
Then, run the following commands:
cd /opt/iota wget -O IRI.jar https://github.com/iotaledger/iri/releases/download/v1.x.x/iri-1.x.x.jar systemctl daemon-reload && systemctl restart iota
Here are some learning resources and references:
- https://forum.iota.org/t/setting-up-a-headless-node-on-a-ubuntu-iri-version-1-2-1/1332
- https://knarz.github.io/notes/iota-node-do/
- http://www.iotasupport.com/gettingstarted.shtml
- https://iota.readme.io/docs/
Configuring Raspberry Pi to work with IOTA’s IRI using an IOTA API
The code below shows our proof of concept for a publicly facing smart locker services implementation that uses an IOTA node and a Raspberry Pi exchanging transactions with the node using IOTA’s API.
Let see how we can build such a service using IOTA quickly.
Importing dependencies on your Raspberry Pi
The following python libraries have to be imported before we can start building our Tangle on Raspberry Pi: getpass, hashlib, json, time, datetime, re, os, RPi,GPIO, operator and iota.
Encrypting your unique seed
We started with create_seed_hash() function to convert a unique seed into a sha256 encrypted seed that users can verify later while authenticating the final transaction value.
Return a sha256 hash value of seed
get_checksum() returns a sha256 encrypted value of the seed. It takes a unique seed and returns a hash object.
To verify the integrity of the address, we check whether our input checksum actually matches the output of get_checksum() in a function named verify_checksum()
We then prompt to use either a “yes” or a “no” to proceed further.
Storing transaction history on a unique file
We then create a unique file name to store the transaction history. The name of the file is created by selecting the first 12 characters of the sha256 value from the seed. Here, create_file_name() takes care of naming the file thus created in a .txt format.
Log in screen for the user
Here we validate user’s login credentials with historical sha256 hash value and store it for the future use.
Note: As we mentioned before, using an online IOTA seed generator. isn’t a good practice. Meanwhile, we create an offline one for you, don’t use this seed generator for anything other than creating a demo seed.
If the file doesn’t exist for a user, create a new one
Using the first 12 characters of sha256, the code will first try to see if a file already exists. If the file doesn’t exist, it will create a new account file and store it for the future references. read_account_data() open file names, and if the names don’t exist, it adds new file names.
We further created a convert_units() function that converts IOTA into a predefined unit within the account settings and returns a unique string to keep the transaction value anonymous.
Generating a valid address and verify it
The code below shows how the address_checksum() function uses Pyota’s address(81 characters) to generate a valid address with checksum of 90 characters.
is_valid() function checks if the output of address_checksum() matches with the checksum. It returns False if the new address doesn’t matches with the checksum.
Update the account file with index, address, and balance
We then write the address, index, checksum, and balance into the account file we created previously.
Storing transaction metadata and other values
Now that we have made sure that we can add and verify addresses, and store files, let’s move on to the next part. Here, we will focus more towards storing transaction related metadata.
In the write_fal_balanace() function, f_index is the first index of the account file, whereas l_index is the last index
The next function that follows – write_transfer_data(), writes transaction data to the account file. These data points it stores are:
- Transaction Hash
- Transaction confirmation
- Timestamp
- Tags
- Address
- Message
- Value of transaction
- and, the Bundle
Update f_index and l_index
With each and every new transaction that takes place, update_fal_balance() updates the f_index and l_index of your file.
Send a request to IOTA via IOTA’s API
Address_balance() sends a request to the IOTA node running on the server and fetches current confirmed balance. Update_addresses_balance() updates the address balance in the account file after a transaction gets confirmed.
Generating addresses and scan them for a balance
The following function, generate_addresses() generates one or more addresses and saves them in the account file after the transaction is confirmed. The other function listed below, find_balance() generates and scans addresses of a Seed for balance. If there are already existing seeds saved in the account file, it will then start with the next possible higher address index.
Now, let’s fetch the first address after the last transaction we made. If there aren’t any saved addresses, the function get_deposit_address() will generate a new one.
Displaying data
In order to display all addresses with balance, the total account balance and deposit address, we wrote a function – full_account_info().
The code below displays all saved addresses and lists their transaction value. If there isn’t any value assigned to an address, in this case, the address will be updated only after a confirmed transaction.
Displaying all address saved and their balance
standard_account_info() displays all addresses, deposit address, balance and the total balance. If there are no saved addresses, it will ask if the account should be scanned for balance.
If the user inputs no, it will generate a deposit address at the index 0.
Making IOTA transactions: Asking the user for Transfer value inputs
We now ask the user to enter the amount and units. Units can be in iota, Megaiota, Gigaiota, etc
Making IOTA transactions: Preparing and reviewing transaction amounts
The fetch all necessary data that is required to perform a transaction, we implemented a prepare_transfers() function that returns the index, address and the transaction value.
To display this transaction on screen before a user can actually make this transaction, we implemented review_transfers(). This allows a user to confirm or cancel a transaction.
Now that we are ready with everything on our Raspberry Pi, we can actually make transactions.
Making IOTA transactions: Attaching to the IOTA Tangle
Earlier in the article, we spoke about setting IOTA’s node. The send_transfer() function below takes the prepared transaction data and sends it to the IOTA node, and makes Raspberry Pi a part of the Tangle network.
Reading transaction history
To show entire transaction history to a user on the GUI, we implemented print_transaction_history() function that takes full_history as an input. If full_history is False, it only returns the transaction history from last 6 hours.
If full_history is True, it returns the entire transaction history.
Tags to derive functionalities from Transactions
As described at the start of this section, we defined three tags to tun on an LED, turn off an LED and Rotate a servo motor.
Now, let’s implement the code to do that as we perform transactions.
Taking in a command and managing execution
We wrote a function, execute_command() that takes in a predefined command that user enters. If a user enters “TURNONLED”, it gets matched with the string of Tag to make a confirmation that lits up an LED. Similarly, entering”TURNOFFLED” and “TURNONSERVO” turns off led and starts the servo motor respectively.
If the user adds an invalid command, they get an error message.
Let’s turn on and off the LED with a Transaction
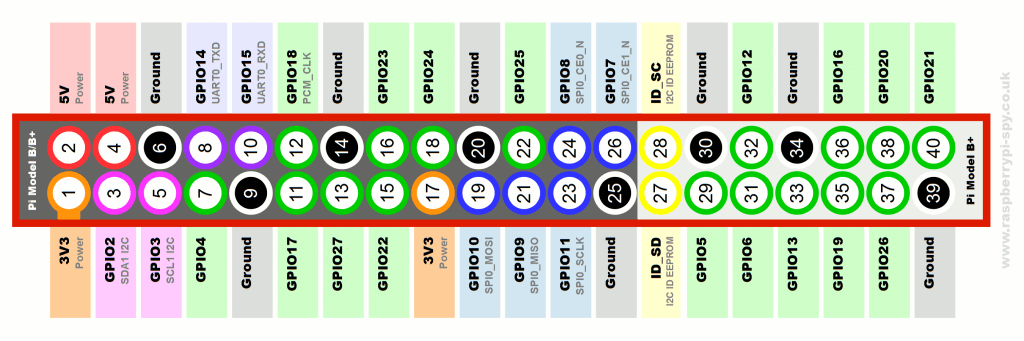
If you are familiar with Raspberry Pi’s Pinout diagram, we are controlling the LED with the pin #18 using GPIO library. Here GPIO.HIGH ensures that the LED is turned on, likewise GPIO.LOW turns it off.
If you aren’t familiar with GPIO layout of Raspberry Pi, look at the image below for references.
Rotating the servo motor to open the Locker
The rotate_motor() function rotates the motor upon receiving an IOTA token. The code is shown below:
Get all associated transactions from saved addresses
We built a function, get_transfers() that fetches all associated transactions from the saved addresses and writes the transaction data in our account file.
Managing them via main.py
All of the functions we have listed before are controlled and executed by main() function.
So, now you have a fully synchronised IOTA node and a Raspberry Pi with a servo motor acting as the door knob integrated properly.
Initially you might observe high transaction times. But, as time progresses, your network topology increases in size subsequently increasing the number of transactions — The transaction time would drastically drift towards seconds and then to milliseconds.
Hope this article helped you learn something about one of the most interesting technology of this year. If you need more explanation, feel free to reach out to me or drop a comment.
